Salesforce Data Loader is a client application that allows users to import or export data in bulk. It is a powerful tool that can be used to insert, update, delete, or export Salesforce records.
Salesforce Data Loader is designed to read, extract, and load data from comma-separated values (CSV) files or from a Salesforce database connection.
Data Loader is an essential tool for Salesforce administrators and developers who need to manage large amounts of data. It is particularly useful for migrating data from one Salesforce instance to another or for updating existing records in bulk.
Data Loader can also be used to extract data from Salesforce for use in other applications or for backup purposes.
Data Loader is available as a free download from the Salesforce website. It can be installed on both Windows and Mac operating systems, and there is also a command-line version available for advanced users.
With its powerful features and ease of use, Data Loader is a valuable tool for any Salesforce user who needs to manage large amounts of data.
Table of Contents
- Understanding Salesforce Data Loader
- Installation and Setup
- Data Import and Export
- Working with Records
- File Management
- Salesforce Data Loader Interface
- Security Measures in Data Loader
- Scheduling Tasks in Data Loader
- Integrations and Compatibility
- Salesforce Data Import Wizard vs Data Loader
- Common Issues and Solutions
- Data Loader Frequently Asked Questions
Understanding Salesforce Data Loader
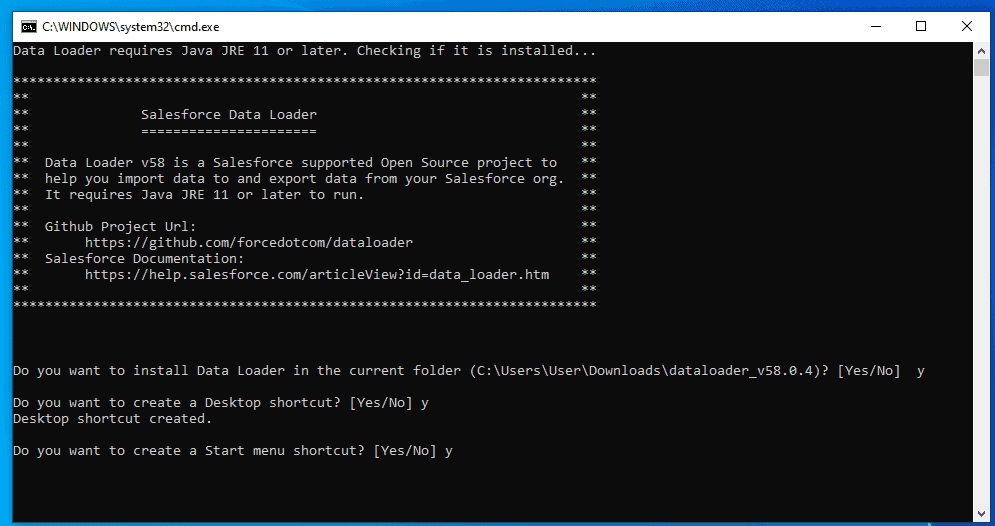
Data Loader is updated with every Salesforce release and the major version number corresponds to the currently available API version. To use Data Loader, you must install Java Runtime Environment (JRE) version 11 or on your operating system.
Unlike most Salesforce features, Data Loader has to be downloaded locally to your desktop to be used (available for both Windows and Mac).
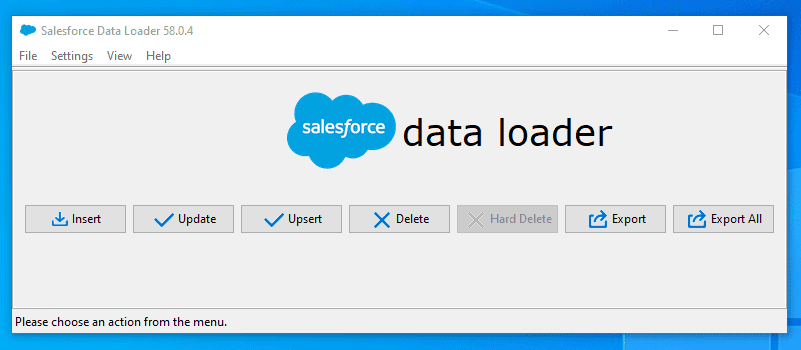
Data Loader can interact with data in many more ways than the Data Import Wizard. There are seven main functions:
- Insert: This gives the user the ability to insert new records into Salesforce.
- Update: This enables the user to make changes to existing records inside Salesforce.
- Upsert: This combines the above options, updates a record if it exists and creates it if it does not.
- Delete: This allows the user to delete records in Salesforce.
- Hard Delete: This permanently deletes records in Salesforce.
- Export: This allows the user to export data from Salesforce and save it as CSV files.
- Export All: This allows the user to export all data from Salesforce, including deleted records.
Data Loader is a very useful tool for managing Salesforce data, especially when dealing with large amounts of data. It is also helpful when migrating data from one Salesforce org to another.
RELATED RESOURCE: Getting Data In And Out of Salesforce
Installation and Setup
The Data Loader installation process is straightforward and requires minimal effort.
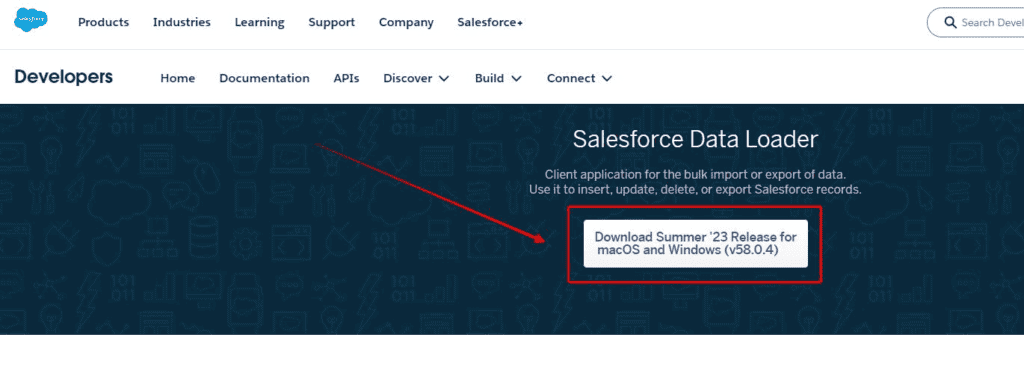
To begin the installation process, navigate to the Salesforce Developer website and download the latest version of Data Loader from the Tools section.
Once you have downloaded and installed Java, proceed with the installation of Data Loader. The user needs to run the installation file and follow the on-screen instructions to complete the installation process.
After the installation is complete, the user needs to configure Data Loader to connect to their Salesforce instance. The user needs to provide their Salesforce username and password, as well as the security token, to establish a connection between Data Loader and Salesforce.
Data Import and Export
Importing Data
Data Loader can be used to import data into Salesforce from CSV files or other external sources. The import process involves mapping the fields in the CSV file to the fields in Salesforce. Data Loader can handle large files, making it an ideal tool for importing large amounts of data.
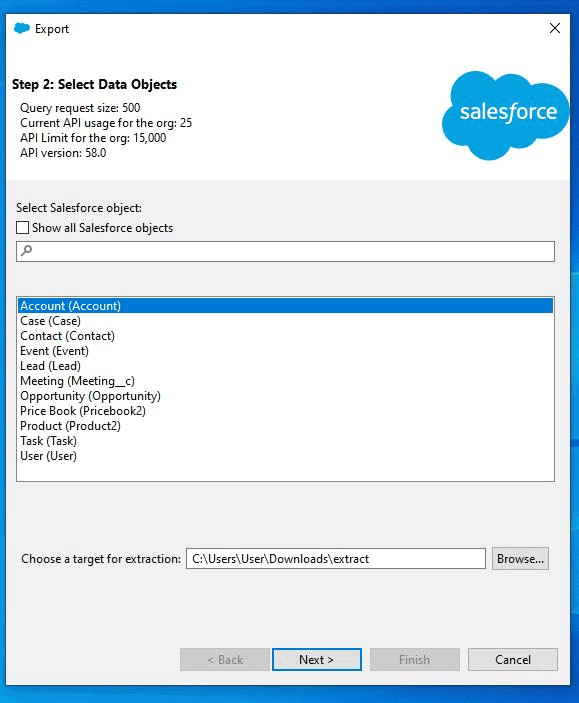
Exporting Data
Data Loader can also be used to export data from Salesforce to CSV files. The export process involves selecting the Salesforce object to export and choosing the fields to include in the export file.
Working with Records

Salesforce Data Loader allows users to insert, update, delete, and upsert records in bulk. Here are the sub-sections that explain how to work with records using Data Loader.
Inserting Records
To insert records using Data Loader, the user needs to follow these steps:
- Prepare a CSV file containing the data to be inserted.
- Open Data Loader and select the Insert operation.
- Select the CSV file containing the data to be inserted.
- Map the fields in the CSV file to the corresponding fields in Salesforce.
- Start the insertion process.
Data Loader inserts the records in the CSV file into Salesforce. The user can monitor the progress of the insertion process using the Data Loader interface.
Updating Records
To update records using Data Loader, the user needs to follow these steps:
- Prepare a CSV file containing the data to be updated.
- Open Data Loader and select the Update operation.
- Select the CSV file containing the data to be updated.
- Map the fields in the CSV file to the corresponding fields in Salesforce.
- Start the update process.
Data Loader updates the records in Salesforce based on the data in the CSV file. The user can monitor the progress of the update process using the Data Loader interface.
Deleting Records
To delete records using Data Loader, the user needs to follow these steps:
- Prepare a CSV file containing the data to be deleted.
- Open Data Loader and select the Delete operation.
- Select the CSV file containing the data to be deleted.
- Map the fields in the CSV file to the corresponding fields in Salesforce.
- Start the deletion process.
Data Loader deletes the records in Salesforce based on the data in the CSV file. The user can monitor the progress of the deletion process using the Data Loader interface.
Upserting Records
To upsert records using Data Loader, the user needs to follow these steps:
- Prepare a CSV file containing the data to be upserted.
- Open Data Loader and select the Upsert operation.
- Select the CSV file containing the data to be upserted.
- Map the fields in the CSV file to the corresponding fields in Salesforce.
- Specify the external ID field to be used for upserting.
- Start the upsert process.
Data Loader inserts records that do not exist and updates records that already exist in Salesforce based on the data in the CSV file. The user can monitor the progress of the upsert process using the Data Loader interface.
RELATED RESOURCE: Connect Data Loader To Your Trailhead Playground
File Management
Salesforce Data Loader provides efficient file management features that allow users to upload, download, and manage CSV files. These files can be used to import or export data from Salesforce. In this section, we will discuss two important aspects of file management: working with CSV files and understanding log files.
Working with CSV Files
CSV files are the most commonly used file format for data exchange between Salesforce and other systems. Salesforce Data Loader allows users to work with CSV files in an easy and efficient way.
Here are some important features of CSV files in Salesforce Data Loader:
- Large file support: Salesforce Data Loader can handle large CSV files (up to 50MB) with up to 5 million records. This makes it a powerful tool for bulk data import and export.
- Flexible mapping: Salesforce Data Loader allows users to map fields from CSV files to Salesforce objects in a flexible way. Users can either use the default mapping or create custom mappings using the mapping wizard.
- Data validation: Salesforce Data Loader automatically validates the data in CSV files before importing it into Salesforce. This ensures that only valid data is imported and errors are caught early in the process.
Understanding Data Loader Log Files
Log files are an important aspect of file management in Salesforce Data Loader. They provide detailed information about the success or failure of data import or export operations. Here are some important features of log files in Salesforce Data Loader:
- Success log files: Success log files provide information about the records that were successfully imported or exported. They contain details such as record IDs, operation type, and timestamp.
- Error log files: Error log files provide information about the records that failed to import or export. They contain details such as error messages, error codes, and record IDs.
- Customizable log files: Salesforce Data Loader allows users to customize the log files to suit their needs. Users can select the level of detail they want to include in the log files and also specify the location where the log files should be saved.
Salesforce Data Loader Interface

Salesforce Data Loader provides users with two interfaces to load data into Salesforce: User Interface and Command Line Interface.
User Interface
The User Interface (UI) is a graphical user interface that allows users to interact with Data Loader through a series of screens. The UI is designed to be intuitive and easy to use, making it an ideal choice for users who are not familiar with command-line interfaces.
Using the UI, users can perform a variety of tasks, including:
- Logging in to Salesforce and selecting a target object
- Defining the source data file and mapping it to the target object fields
- Configuring the batch size and error handling options
- Running the data load job and monitoring its progress
- Reviewing the results and errors of the data load job
The UI also provides a wizard-like interface for creating, editing and deleting mapping files, which define the relationships between the source and target fields.
Command Line Interface
The Command Line Interface (CLI) is a text-based interface that allows users to interact with Data Loader through a command-line prompt. The CLI is designed to be flexible and powerful, making it an ideal choice for users who need to perform complex data load operations or who want to automate their data loading tasks. Using the CLI, users can perform a variety of tasks, including:
- Logging in to Salesforce and selecting a target object
- Defining the source data file and mapping it to the target object fields
- Configuring the batch size and error handling options
- Running the data load job and monitoring its progress
- Reviewing the results and errors of the data load job
The CLI also provides a number of advanced features, including the ability to:
- Schedule data load jobs to run at specific times
- Use a configuration file to store login credentials and other settings
- Use a command-line switch to specify the mapping file to use
- Use a command-line switch to specify the operation to perform (insert, update, upsert, delete, or hard delete)
- Use a command-line switch to specify the source data file format (CSV, XML, or JSON)
Overall, both the User Interface and Command Line Interface provide users with powerful tools for loading data into Salesforce. Users can choose the interface that best fits their needs and preferences, and both interfaces provide a range of features and options to help users get the most out of Salesforce Data Loader.
Security Measures in Data Loader

Salesforce Data Loader provides several security measures to ensure the safety and privacy of data during the import and export process. These measures include user authentication, password policies, and encryption.
User Authentication
Data Loader requires users to authenticate before accessing the application. Users must provide their Salesforce credentials, including their username and password, to log in to Data Loader. Additionally, Data Loader supports multi-factor authentication (MFA) to add an extra layer of security to user authentication.
Password Policies
Data Loader enforces password policies to ensure that users create strong and secure passwords. Password policies can include requirements for password length, complexity, and expiration. Data Loader also supports the use of security tokens, which are appended to a user’s password to provide an additional level of security when logging in from an untrusted network.
Encryption
Data Loader uses encryption to protect data during the import and export process. Data Loader supports Secure Sockets Layer (SSL) encryption to secure data transmission between the client and server. Additionally, Data Loader can encrypt sensitive data fields, such as credit card numbers and social security numbers, during the import process.
Overall, Data Loader provides robust security measures to ensure the confidentiality, integrity, and availability of data during the import and export process. By enforcing user authentication, password policies, and encryption, Data Loader helps organizations maintain compliance with industry regulations and protect against data breaches.
Scheduling Tasks in Data Loader

Data Loader is a powerful tool for importing, exporting, and deleting data in Salesforce. One of the most useful features of Data Loader is the ability to schedule tasks. This allows users to automate the process of importing or exporting data, saving time and reducing the risk of errors.
To schedule a task in Data Loader, users must first create a task configuration file. This file specifies the details of the task, such as the object to be loaded, the file location, and the operation to be performed (insert, update, delete, or upsert). Once the configuration file is created, users can schedule the task using their operating system’s built-in scheduler.
When scheduling a task, users must specify the frequency at which the task should run. This can be daily, weekly, or monthly, and can be set to run at a specific time of day. Users can also choose to run the task only on certain days of the week or month, or to run it only during business hours.
In addition to scheduling tasks, Data Loader also allows users to specify the batch size for each task. This determines how many records will be processed in each batch, and can be adjusted to optimize performance based on the size of the data set and the available system resources.
Integrations and Compatibility

Salesforce Data Loader is a powerful tool that can seamlessly integrate with a range of platforms and services. Here are some of the most popular integrations and compatibility options:
Dataloader.io
Dataloader.io is a cloud-based integration platform that allows users to connect Salesforce with over 100 other applications. It offers a user-friendly interface and supports a range of data formats, including CSV, Excel, and XML. With Dataloader.io, users can easily extract, transform, and load data to and from Salesforce.
Box
Box is a cloud content management and file-sharing service that integrates with Salesforce. With the Box integration, users can easily store and access files directly from Salesforce, making it easier to collaborate with team members and share important documents.
Dropbox
Dropbox is a popular cloud storage service that can be integrated with Salesforce. With the Dropbox integration, users can easily access and share files stored in Dropbox directly from Salesforce.
FTP
Data Loader also supports FTP (File Transfer Protocol) for data integration. With FTP, users can easily transfer files between Salesforce and other systems.
SFTP
SFTP (Secure File Transfer Protocol) is a secure version of FTP that is also supported by Data Loader. With SFTP, users can securely transfer files between Salesforce and other systems.
Mulesoft
Mulesoft is an integration platform that allows users to connect Salesforce with a range of applications and services. With Mulesoft, users can easily integrate data from Salesforce with other systems, such as ERP and CRM systems.
Salesforce Data Import Wizard vs Data Loader
Salesforce Data Import Wizard and Data Loader are two tools that help users import data into Salesforce. While both tools serve the same purpose, they have some key differences. In this section, we will compare the two tools and highlight their strengths and weaknesses.
Salesforce Data Import Wizard
Salesforce Data Import Wizard is a web-based tool that allows users to import data into Salesforce. It is designed for less-technical users and is best suited for small, simple imports of up to 50,000 records. The Data Import Wizard can only import data of Account, Contact, Leads, Solution, and Custom Object.
The Data Import Wizard is easy to use and does not require any installation. Users can simply log in to their Salesforce account and access the tool from the Setup menu. The tool includes a step-by-step wizard that guides users through the import process.
Data Loader
Data Loader is a client application that can be used to insert, update, delete, or export Salesforce records. It is a more powerful tool than the Data Import Wizard and can interact with data in many more ways. Data Loader can handle imports of up to 5 million records at a time.
Data Loader is a command-line tool and requires installation on the user’s computer. It can be used on both Windows and Mac operating systems. Data Loader reads, extracts, and loads data from comma-separated values (CSV) files or from a database connection. When exporting, Data Loader outputs CSV files.
Data Loader is a more technical tool and requires some knowledge of the Salesforce API and data manipulation. However, it provides more flexibility and control over the import process.
Common Issues and Solutions
Here are some common issues that users may encounter when using Data Loader and their solutions.
Login Issues
One of the most common issues that users face is login issues. This can happen when the login credentials are incorrect or when the user’s IP address is not added to the organization’s trusted IP range. To resolve this issue, users should ensure that they have entered the correct login credentials and that their IP address is added to the trusted IP range. Additionally, users should check if they are using the correct login URL.
Data Mapping Issues
Data mapping issues occur when the fields in the CSV file do not match the fields in Salesforce. This can happen when the CSV file is not properly formatted or when the user has not selected the correct object in Data Loader. To resolve this issue, users should ensure that the CSV file is properly formatted and that the correct object is selected in Data Loader. Additionally, users should ensure that the field names in the CSV file match the field names in Salesforce.
Data Validation Errors
Data validation errors occur when the data being imported violates a validation rule in Salesforce. This can happen when the data being imported does not meet the criteria specified in the validation rule. To resolve this issue, users should ensure that the data being imported meets the criteria specified in the validation rule. Additionally, users should check if there are any other validation rules that may be causing the issue.
Data Loader Errors
Data Loader errors occur when there is an issue with Data Loader itself. This can happen when the version of Data Loader being used is outdated or when there is an issue with the installation. To resolve this issue, users should ensure that they are using the latest version of Data Loader and that the installation is properly configured. Additionally, users should check if there are any known issues with the version of Data Loader being used.
Network Issues
Network issues occur when there is an issue with the user’s network connection. This can happen when the user’s network is slow or when there is a firewall blocking the connection. To resolve this issue, users should ensure that their network connection is stable and that there are no firewalls blocking the connection. Additionally, users should check if there are any network issues on the Salesforce side.
Data Loader Frequently Asked Questions
How do I install Salesforce Data Loader?
To install Salesforce Data Loader, you need to have Java Runtime Environment (JRE) version 17 or later installed on your operating system. You can download and install the latest version of Data Loader from the Salesforce website. Once you have downloaded the installer, run it and follow the on-screen instructions to complete the installation process.
What is the difference between Salesforce Data Loader and Dataloader?
Salesforce Data Loader and Dataloader are the same thing. Dataloader is just a shortened version of Salesforce Data Loader.
Can I download Salesforce Data Loader for free?
Yes, Salesforce Data Loader is available for free download from the Salesforce website. You do not need to purchase a license to use it.
What are some examples of using Salesforce Data Loader?
Salesforce Data Loader can be used for a variety of tasks, including inserting, updating, deleting, and exporting data from Salesforce. Some examples of using Salesforce Data Loader include:
- Importing large amounts of data into Salesforce from an external source.
- Exporting data from Salesforce for backup or analysis purposes.
- Updating existing records in Salesforce in bulk.
- Deleting multiple records from Salesforce at once.
Is Salesforce Data Loader supported by Salesforce?
Yes, Salesforce Data Loader is a supported tool provided by Salesforce. It is regularly updated to ensure compatibility with the latest Salesforce releases.
How do I use Salesforce Data Loader?
To use Salesforce Data Loader, you first need to log in to your Salesforce account and generate a new password for Data Loader. Once you have done this, you can launch Data Loader and connect it to your Salesforce account. From there, you can select the operation you want to perform (insert, update, delete, or export), choose the data source, and map the fields between the source and Salesforce. Finally, you can run the operation and monitor the progress and results.