With the release of Salesforce Lightning Experience, it become easier than ever to change the look and feel of the Salesforce User Interface, without the need for developer skills or resources.
There are dozens of different customization options available. In this article, I will highlight some of the key ways you can change the Salesforce User Interface to improve its functionality and usability for your Salesforce users.
Table of Contents
Salesforce Apps
A Salesforce app is a collection of pages, components, and functionality that work together to provide a specific set of features and capabilities. Salesforce apps are built on the Salesforce platform and can be customized to meet the specific needs of an organization.
Salesforce apps can be used to perform a wide range of tasks, such as managing sales leads, tracking customer interactions, and analyzing data. They can be accessed through the Salesforce user interface or through mobile devices using the Salesforce mobile app.
Salesforce comes with a variety of default apps, ready for use in a brand new Org, but new apps can be created based on your Org, and your custom objects, to help your Salesforce users get the most out of the program.
How do you edit an existing Salesforce App?
An existing Salesforce App can easily be edited by going to Setup, typing App in the Quick Find box, and then selecting App Manager.
From the list of apps, select the downward pointing arrow on the right-hand side and then choose Edit.

Then you can adjust each aspect of the App from Details & Branding of the App, to App Options, Utility Items, Navigation Items, and the User Profiles that the App is available.
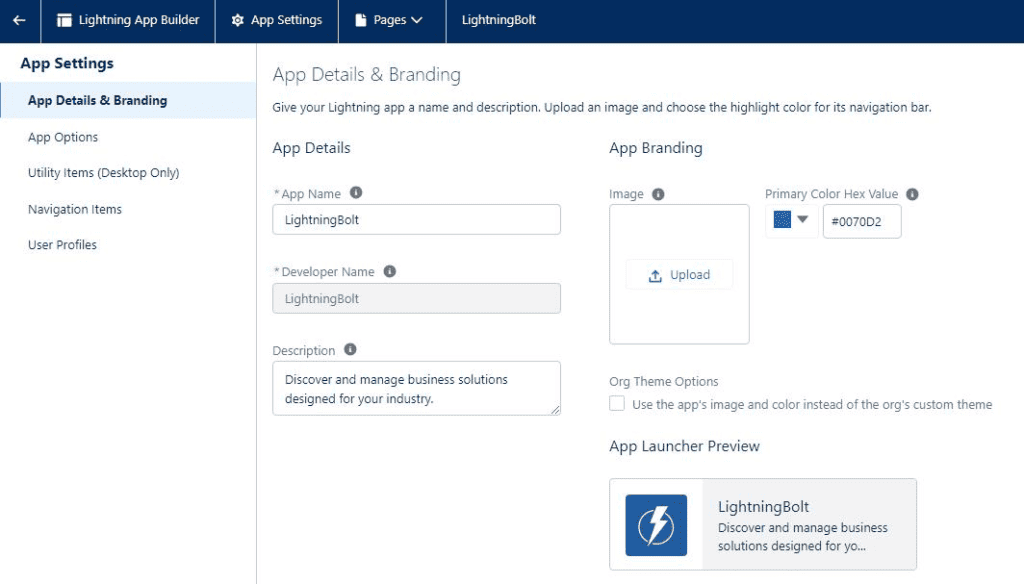
Check out this detailed step-by-step guide I made, including screenshots, on how to edit an existing Salesforce app.
How do you create a new Salesforce App?
A new Salesforce app can easily be created by entering the Setup area and searching for App in the quick find search box.

Select App Manager from the search results, and then choose New Lightning App. A Lightning App Wizard will guide you through the process of creating a new app.
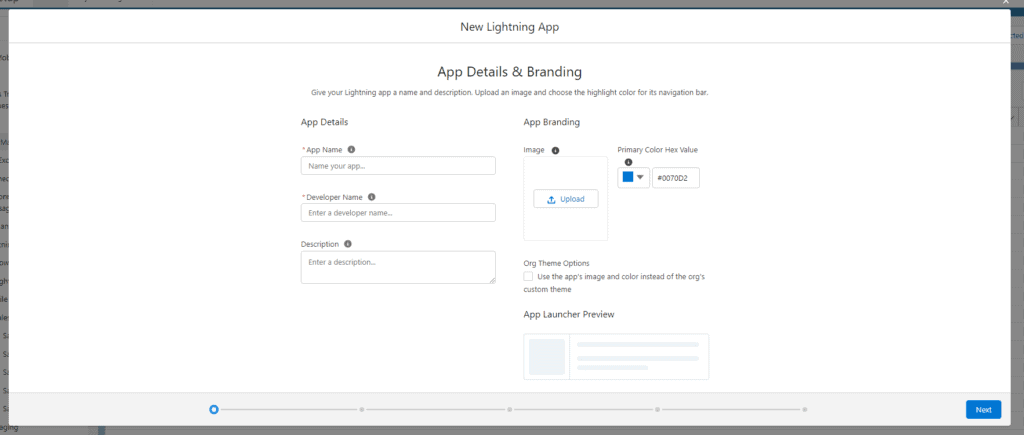
View the step-by-step guide I made, including screenshots, on how to create a new Salesforce app.
Salesforce Pages
Lightning Experience Pages are designed to provide a modern and intuitive user interface that is optimized for desktop and mobile devices.
Lightning Experience pages can be customized to meet the specific needs of an organization. They can include custom components, such as charts, tables, and forms, that are built using the Lightning Component Framework.
Lightning Experience pages can also be customized using drag-and-drop tools, such as the Lightning App Builder. Pages are commonly used as the home page for custom apps and the record pages for object records.
Some of the key features of Lightning Experience pages include:
- Responsive design: Lightning Experience pages are designed to work seamlessly on desktop and mobile devices, providing a consistent user experience across all devices.
- Customizability: Lightning Experience pages can be customized to include specific features and functionality, such as custom objects, workflows, and reports.
- Drag-and-drop tools: Lightning Experience pages can be customized using drag-and-drop tools, such as the Lightning App Builder, which makes it easy for users to create custom pages without the need for coding skills.
- Integration with other Salesforce features: Lightning Experience pages can be integrated with other Salesforce features, such as dashboards, reports, and workflows, providing a centralized location for all of an organization’s data and processes.
How do you edit an existing Salesforce Page?
To edit a Salesforce page you need to open the page in the Lightning App Builder. There are two ways to do this. The quickest and easiest way is to navigate to the app, and page that you want to edit, then choose on the gear icon, and choose Edit Page.

Alternatively, you can enter Setup, type ‘app builder’ in the quick find box, open the Lightning App Builder, choose the page you want to edit, and select Edit.
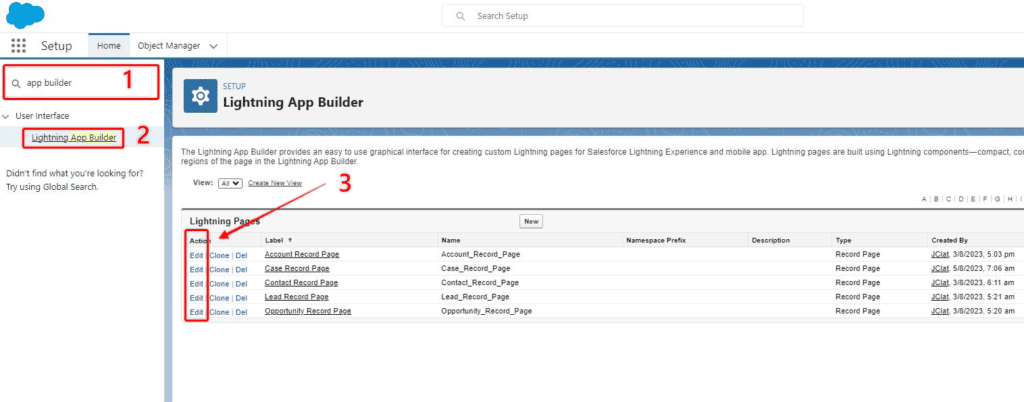
Both of these processes will take you to the Lightning App Builder, where you can add, remove, resize, and configure page components.
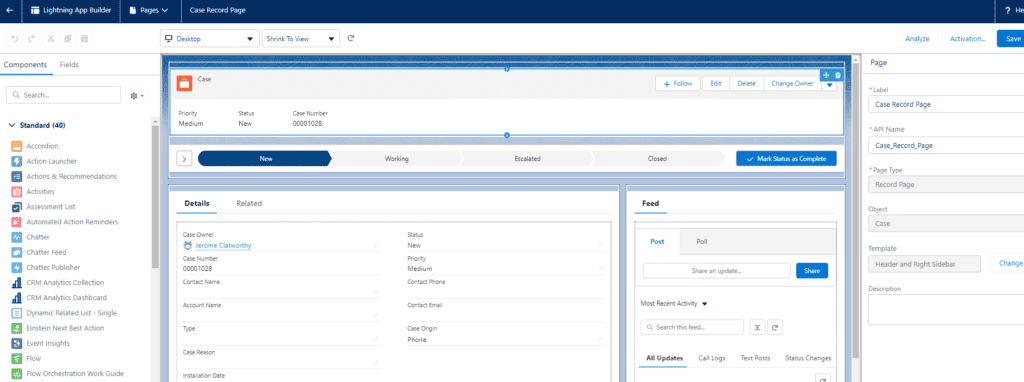
View the detailed step-by-step guide I made, including screenshots, on how to edit an existing Salesforce Lightning Page.
How do you create a new Salesforce Page?
To create a new Salesforce page from scratch, go to Setup, enter ‘app builder’ in the quick find box, select Lightning App Builder, and New.

If there is an existing page with structure and elements you plan to use, you can clone an existing page adjust as required, or start a completely new design from scratch.
View my detailed step-by-step guide, including screenshots, on how to create a new Salesforce Lightning Page.
Updating The Record Highlights Panel

If you would like to configure different fields, and buttons to appear on your Highlights Panel, you can do so in the Object Manager, of the Object of the particular record page.
You can either navigate to the Object Manager via the Setup area or select the Compact Layout link in the right-hand sidebar.

This will take you to the Compact Layout section of the Object Manager, and you can open and adjust the layout, or create a new one for a specific purpose (e.g. Mobile view).

You can edit/delete and manage the compact layout assignment.

You can add, remove, and re-order the fields that you want to appear in the Compact Layout, and then save your changes.

Updating the Record Detail
The fields that appear in the Record Detail component are determined by the assigned Object Page Layout.
To edit these fields, select the page layout link from the right-hand sidebar.
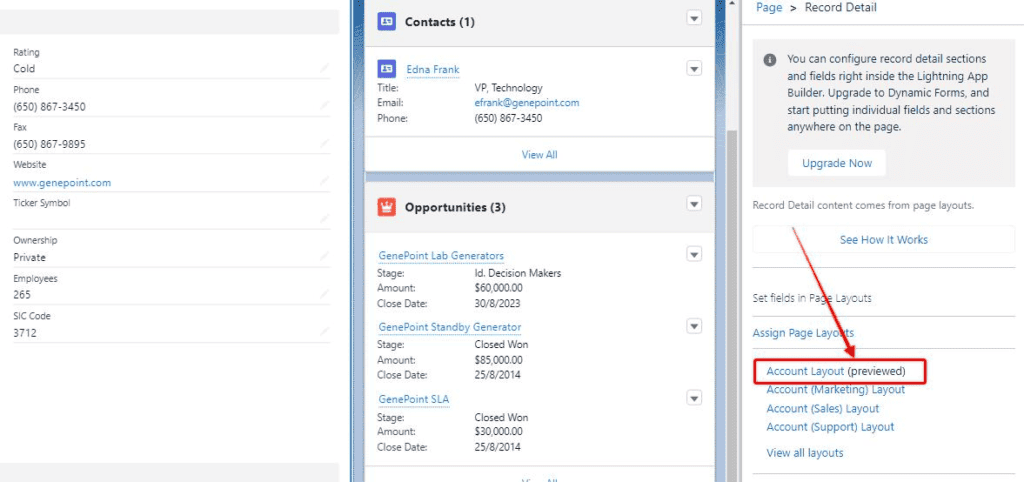
This will take you to the Page Layout view of the Object Manager, and you can add or remove fields that you want to appear, create new sections, or remove sections. Once you have configured the page layout to your liking, Save your changes, and they will be reflected in your Lightning Page.
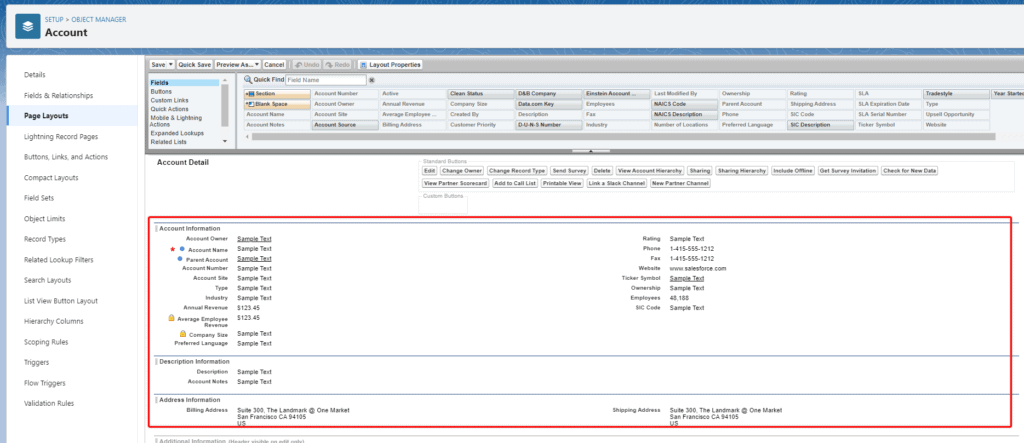
Salesforce List Views
A Salesforce list view is a customizable view of a set of records in Salesforce. List views are used to display and manage records of a specific object, such as accounts, contacts, opportunities, or cases.
List views can be customized to meet the specific needs of an organization. They can be filtered, sorted, and grouped based on specific criteria, such as date, status, or owner. List views can also include custom columns, such as custom fields or related records.
Some of the key features of Salesforce list views include:
- Customizability: List views can be customized to include specific fields and columns, as well as filters and sorting criteria.
- Productivity features: List views include several productivity features, such as inline editing, mass actions, and export to Excel, that help users work more efficiently.
- Collaboration features: List views can include collaboration features, such as Chatter feeds, that allow users to collaborate and communicate with each other.
How do you edit a Salesforce List View?
When you select an Object from a Salesforce App navigation bar, you will be presented with a variety of list views you can use to view object records that meet certain criteria.

I typically advise that you close existing lists, and then configure them to your liking, rather than editing the default lists, but editing lists (default or custom) is easily done if required. The three main ways you can edit a list are by adjusting the filters that determine the records that appear in the list, adjusting the fields that are included for each record, and adjusting who can see the list.

View the detailed step-by-step guide I made, including screenshots, on how to edit a Salesforce List View.
How do you create a new Salesforce List View?
A new Salesforce list can be created by either cloning an existing list or creating a new list and then configuring it to your needs.
Either approach can be achieved by being on any other list view, then selecting the gear icon, and choosing Clone, or New.

Once you have selected your preference, give your list a name, choose who can access it, and then go on and configure the list to your preferences by adjusting the filters and columns that appear.
View the detailed step-by-step guide I made, including screenshots, on how to create a new Salesforce List View.
Salesforce Buttons
Salesforce buttons are clickable elements that make it quick and easy for you to get from one place to another. Buttons act as links to other websites, systems, or other parts of Salesforce.
When nested in the right locations, they enhance your end user’s ability to get access to all relevant information they need, without manually having to navigate from one place, or system, to another.
When I use the word Buttons, I’m going to refer to Buttons and Links, which covers the three main button elements you can configure on a Salesforce object (apart from Actions, which I cover next).
There are three different types of buttons you can configure on a Salesforce object:
- Detail Page Link
- Detail Page Button
- List Button
For any of these button types, you can configure them to direct the user to a URL, OnClick Javascript, or Visualforce Page. For most Salesforce Administrators, you will be using buttons for URLs and are not likely to have use for the Javascript or Visualforce use cases.
In the event that you do, you are likely to have a developer on hand to assist, as they will need to develop the Visualforce or Java Script initially.
However, there is a lot you can do with URL buttons, in conjunction with the formula editor provider.
How do you edit a Salesforce Button?
In Salesforce, Buttons are associated with objects, not a standalone component. To edit a button, enter Setup, navigate to the Object Manager, open the object in question, and select Buttons, Links, and Actions.

From the list of buttons, find the button you want to edit, select the downward pointing arrow on the right-hand side of the button in question, and select Edit. Then depending on the nature of the button and its function, you can make the required changes, and Save those changes.

How do you create a new Salesforce Button?
To edit a button, enter Setup, navigate to the Object Manager, open the object in question, and select Buttons, Links, and Actions.

Choose New Button from the right-hand side of the page.

Configure the button to your needs. Particularly pay attention to the location and content source.
Once you have created your new button, you will then need to adjust relevant page layouts to make the button available.
URL buttons are the most popular button Content Source for many admins, as Visualforce and Javascript use cases are less prevalent in Lightning Experience.
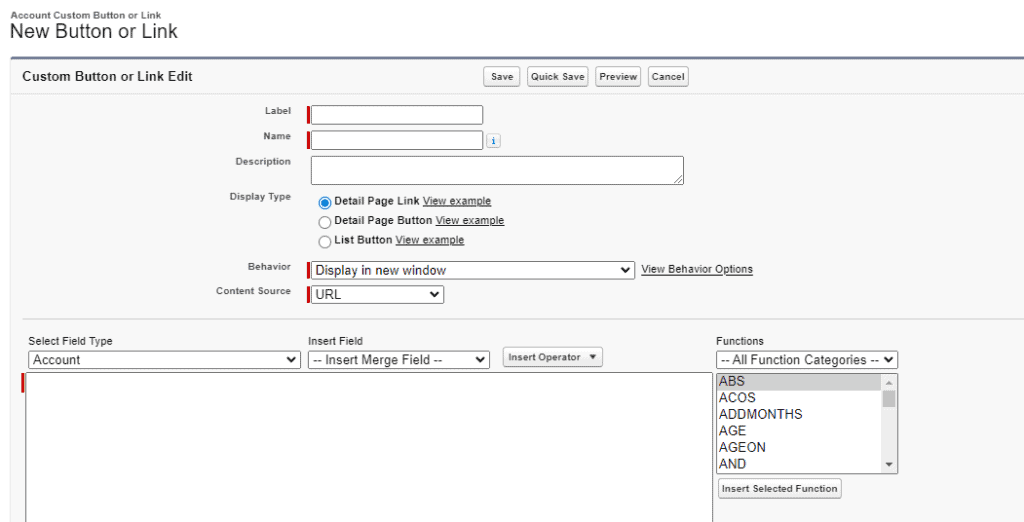
Here is a link to a detailed step-by-step guide I made, including screenshots, on how to create the three different Salesforce Button types, and add to the page layout.
Salesforce Actions
Salesforce actions are predefined tasks that can be performed in Salesforce. Actions can be used to create a new record, update an existing record, or perform other tasks, such as sending an email or triggering a ScreenFlow.
Actions make it quicker for your users to perform certain tasks, and navigate the platform to improve user efficiency and satisfaction.
While Salesforce Buttons are always connected to a specific Object and configured in the Object Manager, Salesforce Actions can relate to a specific Object, or be configured as Global actions available anywhere actions are supported in Salesforce.
How do you create a new Object-Specific Action in Salesforce?
To create a new Object-Specific Action, open Setup, then Object Manager, choose the Object you would like to create a new Action for, open Buttons, Links & Actions, and choose New Action.

Select the type of Action you want to create. In this example, I am going to make a Create a Record action.

Choose the target Object of your Action. For example, in my case – which Object do I want to create a new record for? I am going to choose a create a new note record.

Complete the rest of the Action details, including name and description, and Save the new Action.

Once the new action has been created, you will need to add it to the relevant page layout to make it usable.
The type of Action you create will determine the location you wish to save it.
For example. you may have created a New Note type Action, that you want to appear on the Contact Record pages. In that case, you will go to the Contact object settings and configure it to display there.
Alternatively, you may have created a Record Update action for the Account Object, but you want that to be available on the Contact object so people can update Account details without needing to navigate back to that Object directly.
In that case, you will again go to the Contact object, and perhaps the Record Detail Lightning Page (depending on the Action type), to configure the Action.
For demonstration purposes, in this example, I will add this New Note Action to the Contact Page Layout. I acknowledge that this is not necessarily needed, but it will serve as a good demonstration of the process of adding an Action to an Object record page layout.
To add a New Action, go to the Page Layout of the Object you want to add the Action to. Select the new Action from the list of available Mobile & Lightning Actions, and drag it to the layout.
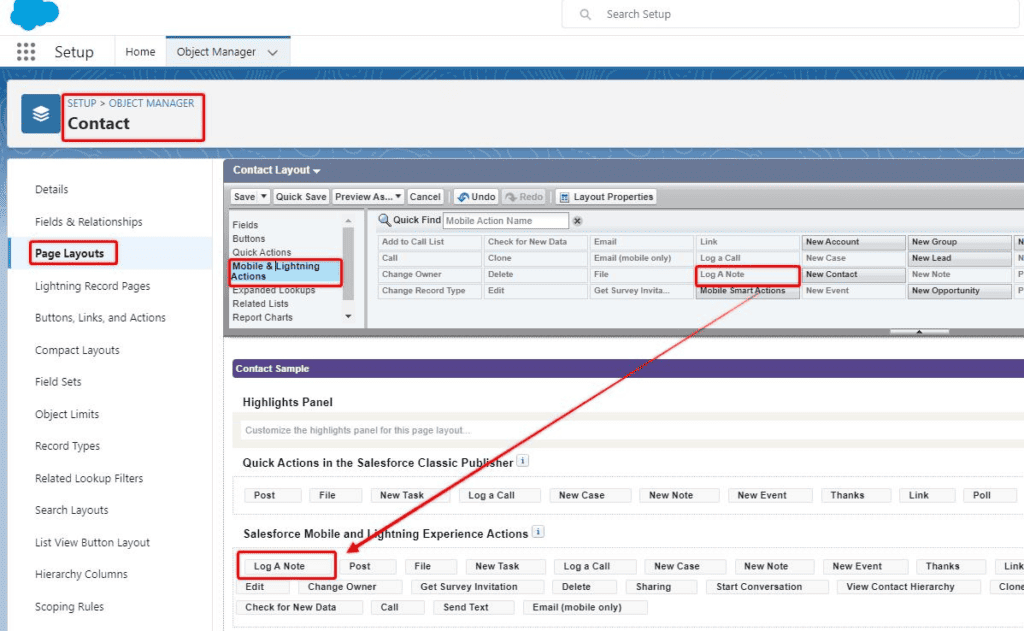
Save the changes, then navigate to the Object Interface and you will see it now available to be used.

How do you create a new Global Action in Salesforce?
To create a new Global Action open Salesforce Setup, type ‘global’ in the quick find box, select Global Actions, and then New Action.
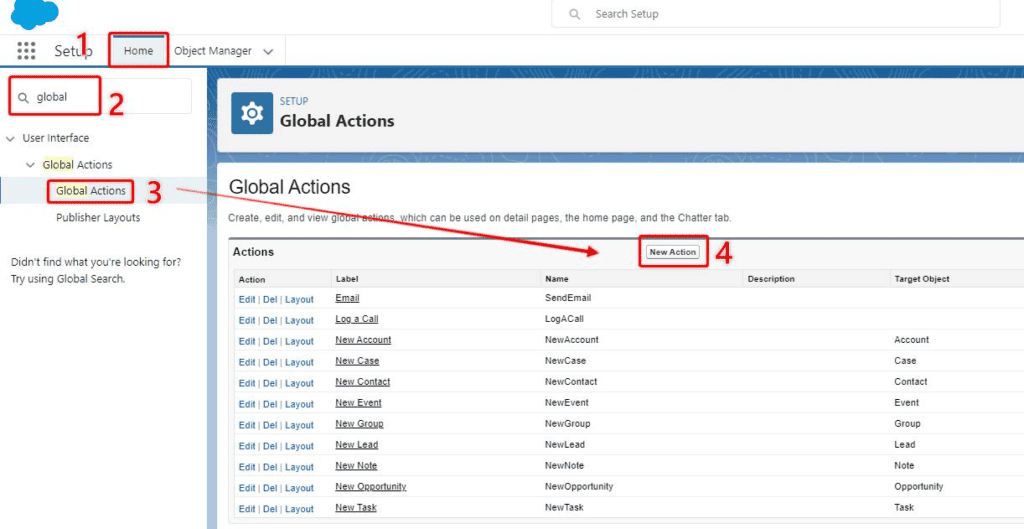
Select the type of action you want to create.

Select the Target Object of the Action – label it, and Save.

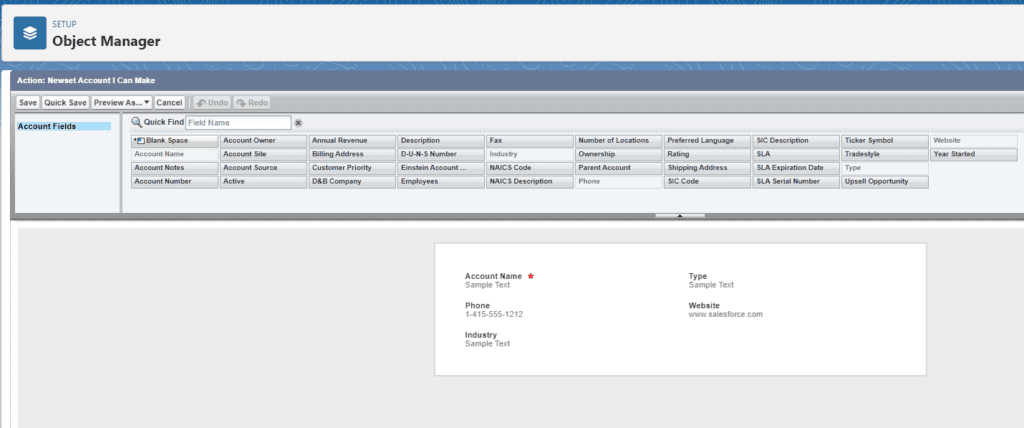
Depending on the type of Action you are creating, there will be further configuration to complete. E.g. In this New Record action, I now need to select which field I want to appear on the dialogue window, and in what order.
Once your Global Action is created you need to add it to the user interface. This is done with the Publisher Layout settings. In Settings, search for ‘publisher’ in the quick find settings, open Publisher Settings, and edit the Global Layout.

Find the new Action you created and add it to the Global Publisher Layout, then save your changes.
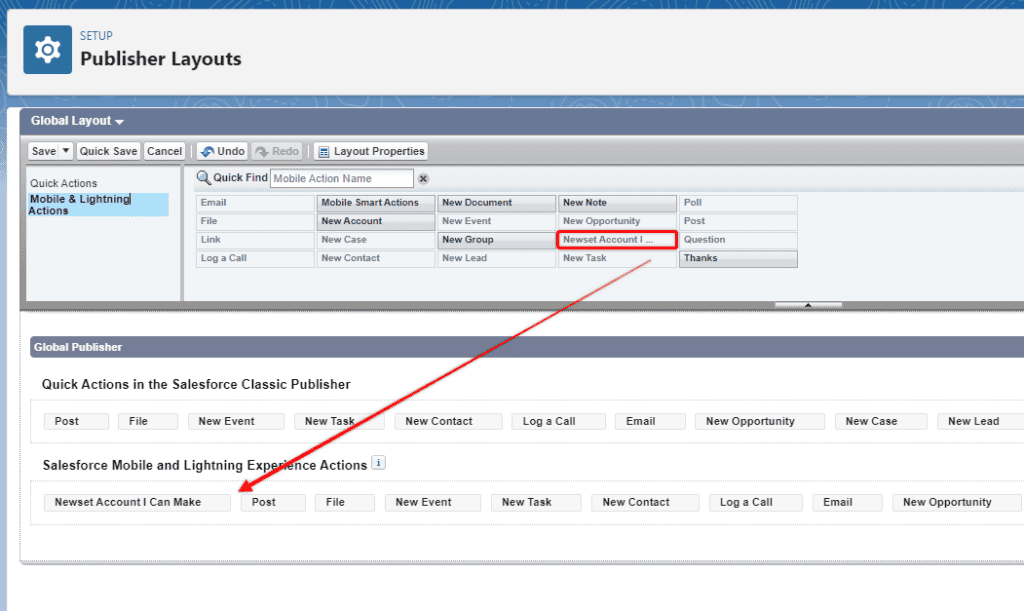
When you exit the Setup area, you can now see your new Global Action.

What’s the difference between a Salesforce Button and an Action?
It can be confusing to try and get your head around the difference between buttons and actions.
Specifically because in some Salesforce help materials, it states that “buttons are a type of action”, but in the Salesforce Setup interface, buttons and actions are configured separately, and manipulated on the page layout separately, and sometimes an Action will be presented as a button, but in other cases, they are not.
The key difference between a Salesforce Button and an Action is that by definition, a button will take you somewhere, whilst an Action will make it quick and easy for you to do something.