One of the many advantages of using Salesforce to run your business, rather than a spreadsheet, or other simple CRM, is the flexibility you have to customize the access each user has to data and functionality.
In some cases, this will be needed to enhance and preserve privacy and ensure staff is not interfering with the actions and processes of other staff, and in some cases, this will be for convenience and making sure Salesforce users can navigate the system, and perform their duties quickly and easily.
In this article, I explain some of the ‘levers’ available to you as a Salesforce Administrator that you can use to control who can see what in your Salesforce Org.
Table of Contents
Access To Salesforce Records
Each record in an object represents a unique instance of that object. For example, an Account record represents a specific organization or company, while a Contact record represents a specific person associated with that organization.
A Salesforce record contains a set of fields that store information about the object. For example, an Account record may have fields for the company name, address, phone number, and website. Each field can be populated with data specific to that record.
In many organizations, controlling which users have access to which Salesforce records is important for both commercial and privacy-related considerations.
Salesforce Sharing Settings are the foundational settings within Salesforce that determine how much access users have to each other’s data. All users will have access to records they own by default, but the question is whether users can see each other’s data and, if so, in what situations.
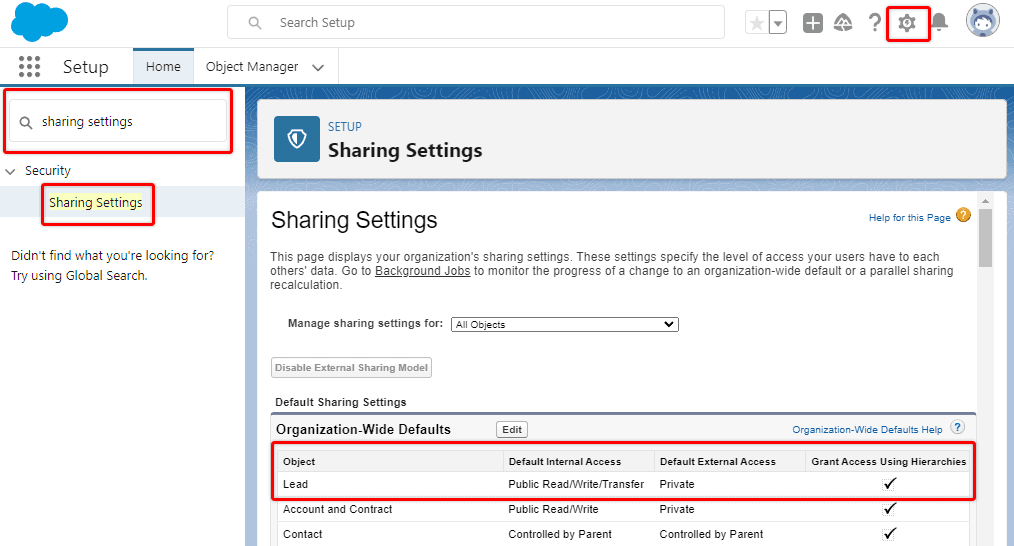
You can configure rules for each object which is important because there are often compelling reasons for multiple people to see some records, and only one person to see others.
The main Sharing Settings available for an object are:
- Private (records only viewable by record owners)
- Public Read Only (records viewable by all, but only editable by owners)
- Public Read/Write (all records viewable and editable)
- Controlled by parent (child record visibility determined by parent record visibility)
Many organizations opt to lock their object security down very tight, then use Roles and other tools to open record access as required.
How Can Managers View The Records Of Their Team
For managers to support staff members effectively and keep track of their productivity, it is often important for them to view their records and the progress they are making with their work.
Likewise, regional managers would like to see the records and performance of the multiple sales teams they oversee, and a CEO would like to be able to monitor the performance of all teams under all regional managers or Sales VPs.
If the object security of the Opportunity (or other) object is configured to private, then only the record owner will be able to see their allocated records, not even their manager.
Salesforce implemented the concept of Roles, and the Role hierarchy to solve this problem of keeping records private, whilst still allowing managers, and others higher up in the hierarchy to see the records of users below them in the hierarchy.
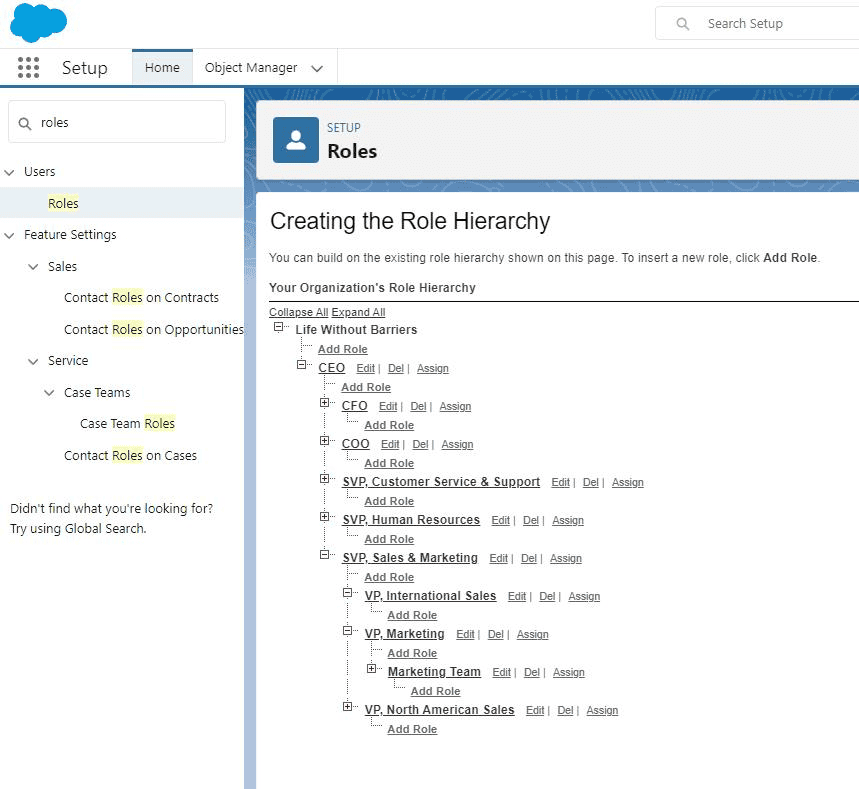
When creating a new user, you have the ability to set their position in the role hierarchy, alongside other settings such as profile and allocated permission sets.
KEY CONCEPT
It is important to note that the sole purpose of Roles and the Role hierarchy, is to determine access to records. It may reflect the actual corporate structure of an organization, but that is not the stated intention.
Role hierarchy should be created and updated to reflect which users need access to which records ONLY.
Determining Record Access By Object Access
Another way to determine whether a user can access records of a particular object is by controlling access to the object itself. If a certain user profile should not be able to see Opportunity object records, then you can eliminate access to that Object completely, and they will not be able to see any associated records. Access to Objects is covered in detail later in this article.
Manual Sharing
A user can choose to share a record manually if they want or need to.
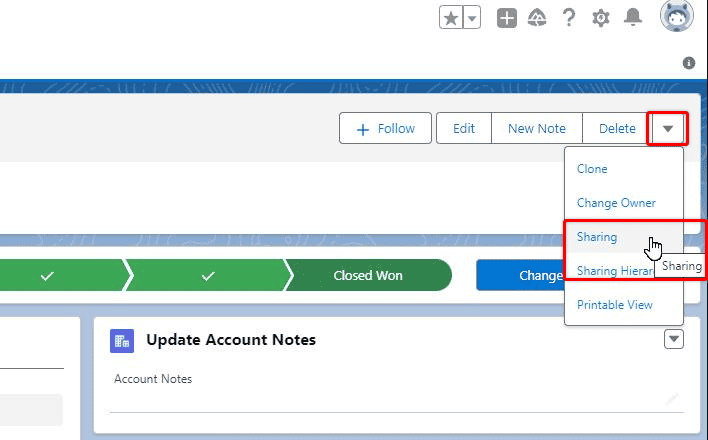
Opening the Sharing settings of a Salesforce record will open a dialogue box where the user can select to share the record with another user, a public group, all users with a certain role, or all users with a certain role and their subordinates in the role hierarchy.
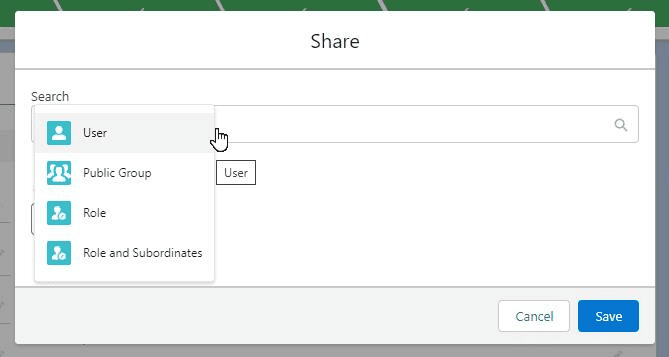
When access is being shared, you can opt to provide Read Only or Read/Write Access.
Sharing Rules
Further to Object, Role, and Manual Sharing settings, the access to Salesforce Object’s records can be enhanced with Sharing Rules.
When you enter the Sharing Settings area of Salesforce Setup, choose an Objectt, scroll down to the Sharing Rules section, and choose New.
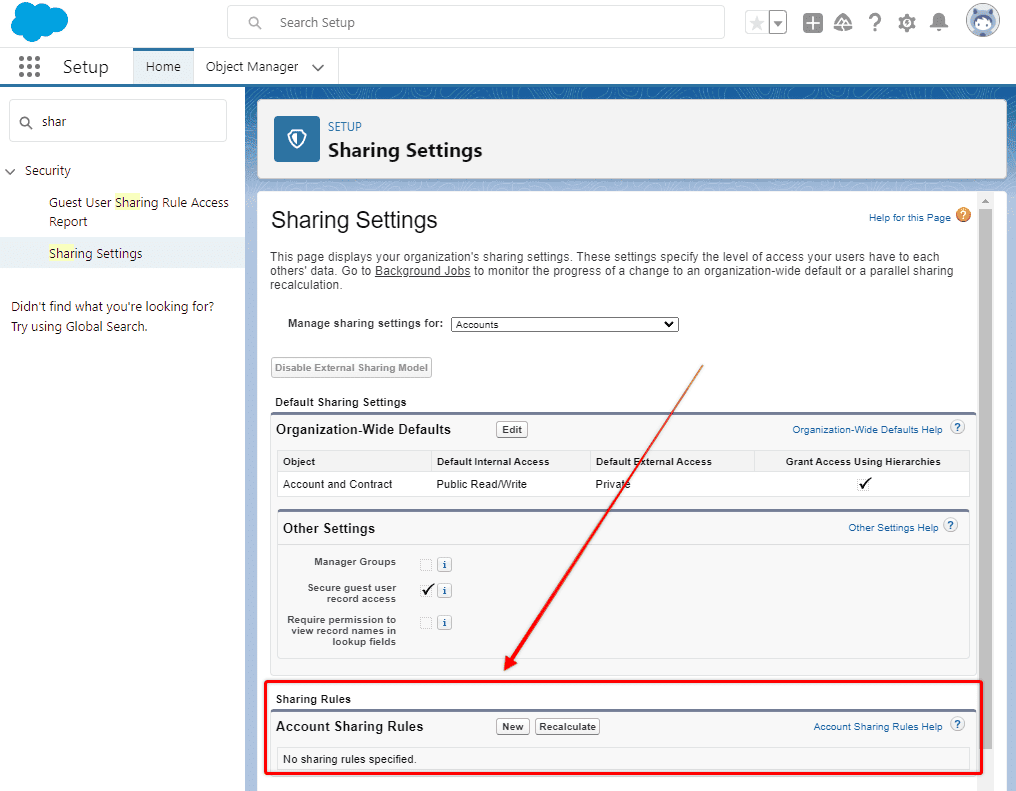
Sharing rules are configured by creating a filter that identifies which Object should be shared (based on whether to record is owned by a certain role or group), and then determining which users those records should be shared with using the same filtering criteria.).
Once you have determined which records should be shared with whom, determine the level of access the users have to that record (read/write), and Save the new rule.
Once a rule has been created it can take time for Salesforce to re-calculate the new permissions for all users in an Org to the relevant records, so allow some time for this before you expect the new rules to be fully operational.
Salesforce Queus
When a record is assigned to a queue, the ownership of the record is transferred from a single user to the queue. This means that any member of the queue can take ownership of the record and perform actions on it. Salesforce queues are not used in every Salesforce Org, but they can be a very useful tool in certain circumstances.
Salesforce Record Types
Record types are a powerful tool for customizing Salesforce to meet the specific needs of different users in your organization. Record types are a way to organize and differentiate between types of records within an object based on certain criteria.
A key feature of record types is the ability to create multiple different experiences of the same object. A common example used when explaining the impact of record types is the example of a sales team to sells a broad variety of goods.
For example, your company might sell technology equipment to big corporations and you might have one salesperson that is focused on computer sales, and another that is focused on phone sales.
Though they both work in the same sector (technology) for the same company, their focus is very different.
As a result, if you configure your Salesforce Org to suit the computer sales process, it might be hard to use, and ineffective for staff involved in selling other line items.
Thankfully Salesforce recognised this and implemented the record type functionality. Record types allow you to configure different page layouts, fields, sales paths (stages), and picklist values then determine which page layouts appear, based on the user profile of the user accessing the record.
This enables you to reduce unneeded fields and field values for different users.
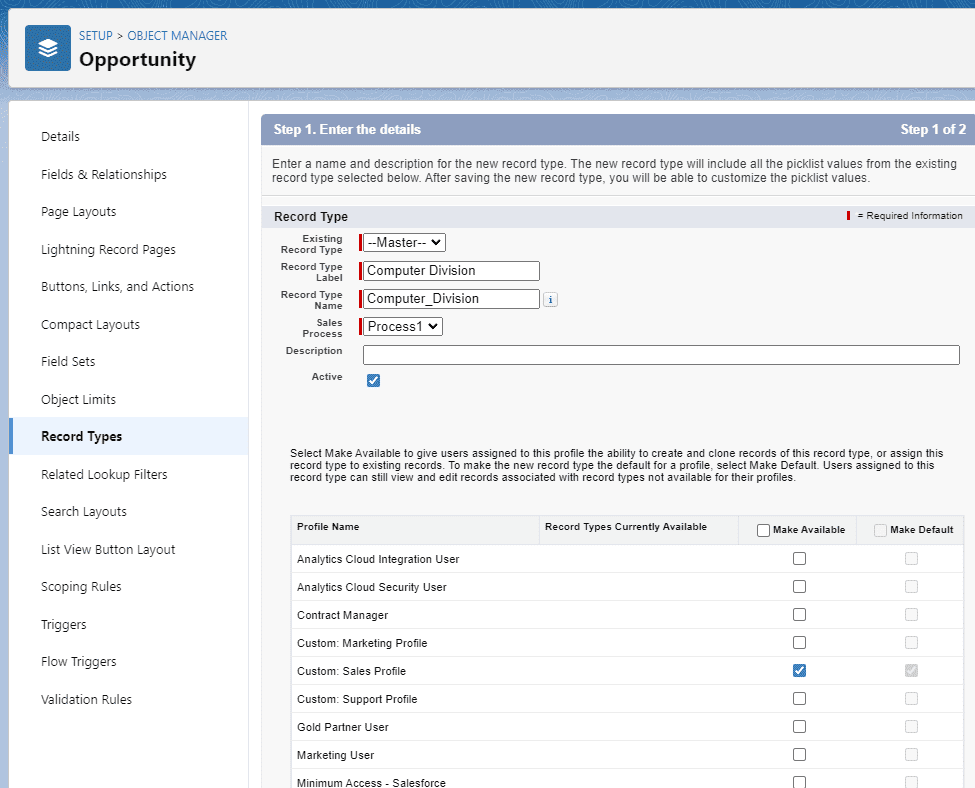
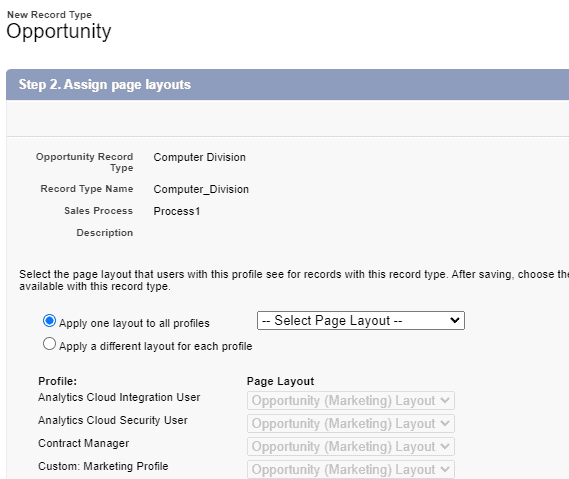
Configuring Record Types
Record Types are configured on the Object settings of a particular object, and then Record Types. Create a new record type, associate it with a Sales Process (Path) for that object, a profile, then determine whether a single page layout should be showing to all profiles assigned to this record type, or if you want to be more granular.
This simple configuration step can have a significant positive impact on end users.
It allows you to configure a user’s experience to show them only what they need, and nothing they don’t need making it quicker and easier to navigate Salesforce.
You can also customize the picklist values that appear in a drop-down box based on record type to increase the speed and accuracy of data entry as well.
Access To Salesforce Apps
A Salesforce App, or Application is a collection of tabs and components that are grouped together in a container with a name and logo. Salesforce comes with some pre-built apps (e.g. Sales, Support, Marketing) for common functions, but you can also make your own Salesforce Apps.

Apps are often used to help people who perform certain job roles have easy access to the Objects that they often work with to reduce the amount of time they need to navigate to other areas of the Salesforce CRM.
The Apps that a user has access to in Salesforce are determined by their Profile, which is a compulsory field when creating new users in Salesforce. There are two main ways to enable app access for different user profiles.
Option 1 – User Administration
To edit which apps a profile has access to enter Salesforce setup, search for ‘user’ in the quick find box, open User setting, select Profiles, choose the Profile you want to edit, and then scroll down to the Custom App Settings section.
In this section, you can select which apps are visible to the profile you are editing, and also select a default app that opens for each user each time they log in to Salesforce.
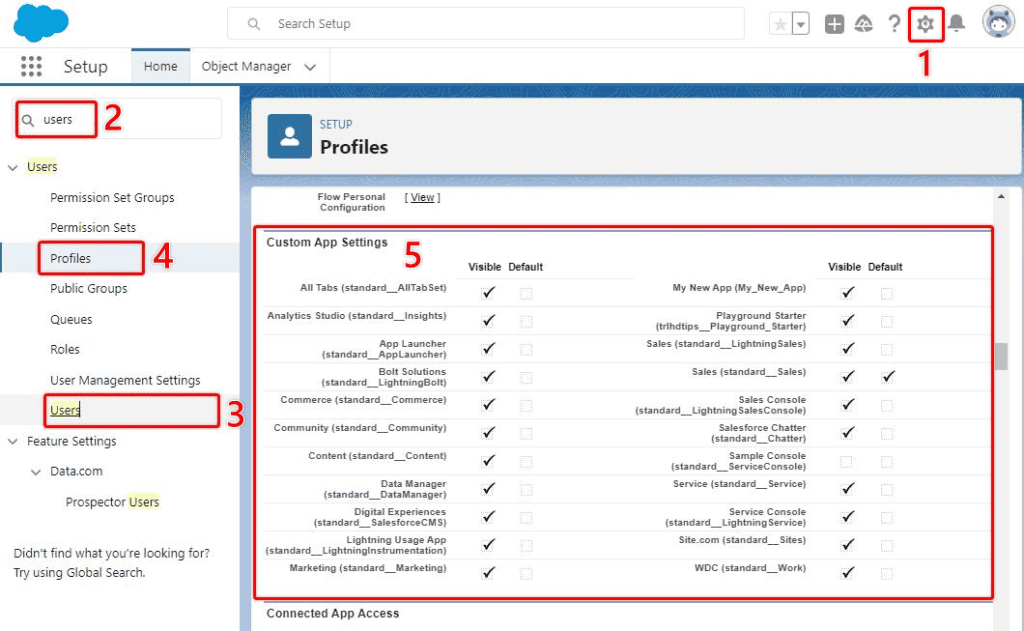
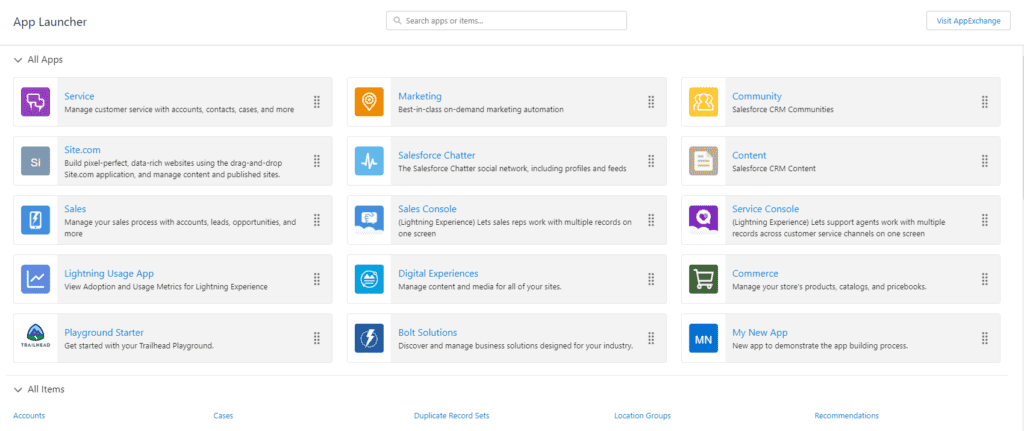
The apps that you enable will be available for users with that profile when they open the app launcher.
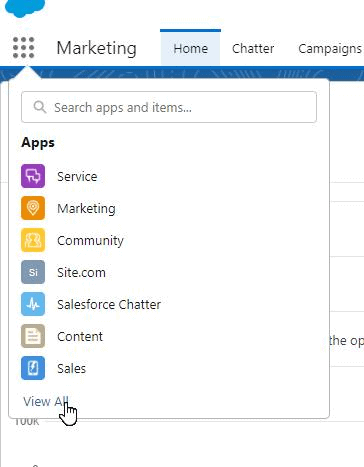
FUN FACT
In Australia, where I am from, one of our free-to-air TV channels (Channel 9) has a logo very similar to that of the App Launcher ‘nine dots’. So, in user training, we usually teach users to open apps by selecting the ‘Channel 9’ logo.


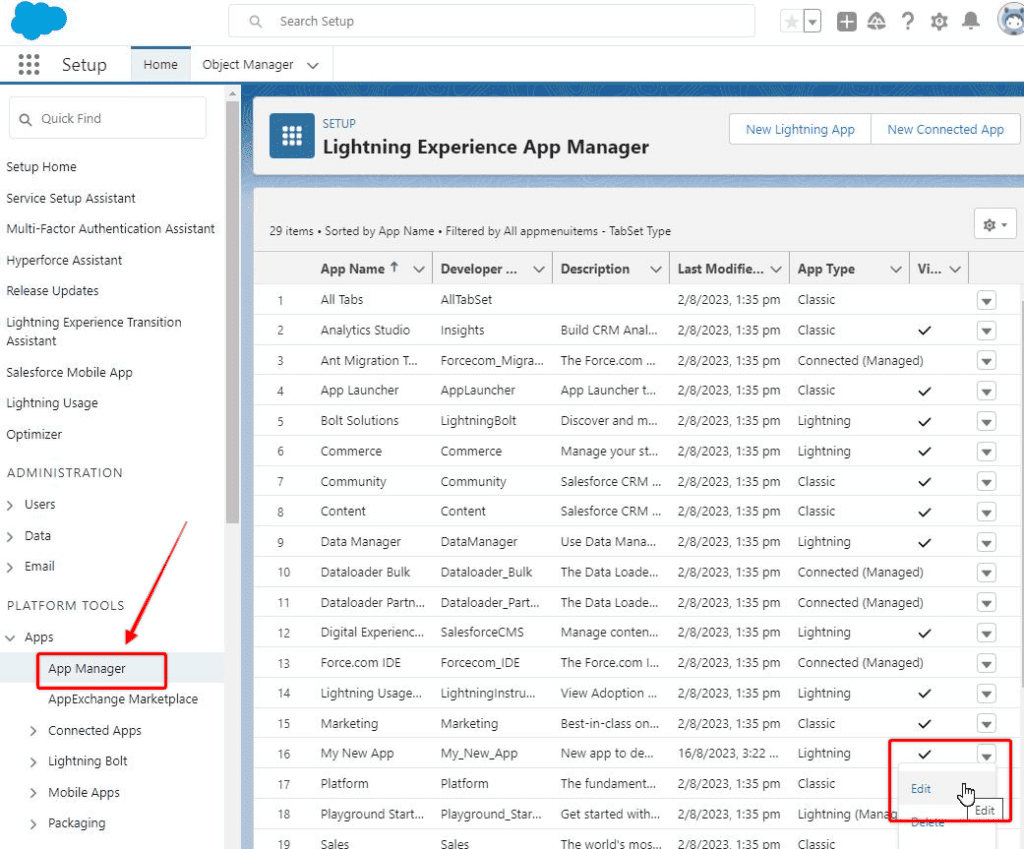
Option 2 – App Manager
The other way to determine which profiles can access an app is in the App Manager in the Platform Tools area of Setup.
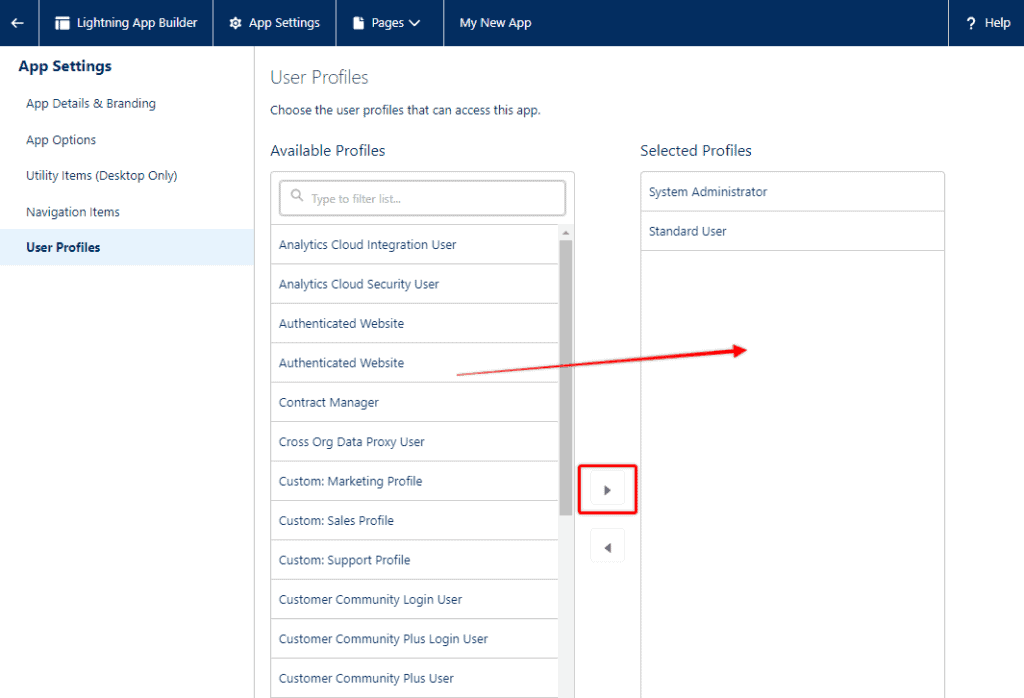
Then under the User Profiles, add the profiles you want to the Selected Profiles section, and Save the changes.
Access To Salesforce Objects
In Salesforce, an object is a database table that stores data related to a specific type of record, such as an account, contact, opportunity, or lead. Objects are the foundation of the Salesforce data model and are used to organize and store data in a structured way.
Each Salesforce object has a set of fields that define the data that can be stored in that object. Access to Salesforce objects can be customized for each Salesforce based on the needs of their job role.
There are two main ways you can enable, or disable access to a Salesforce Object for your Salesforce users.
Option 1 – User Profile
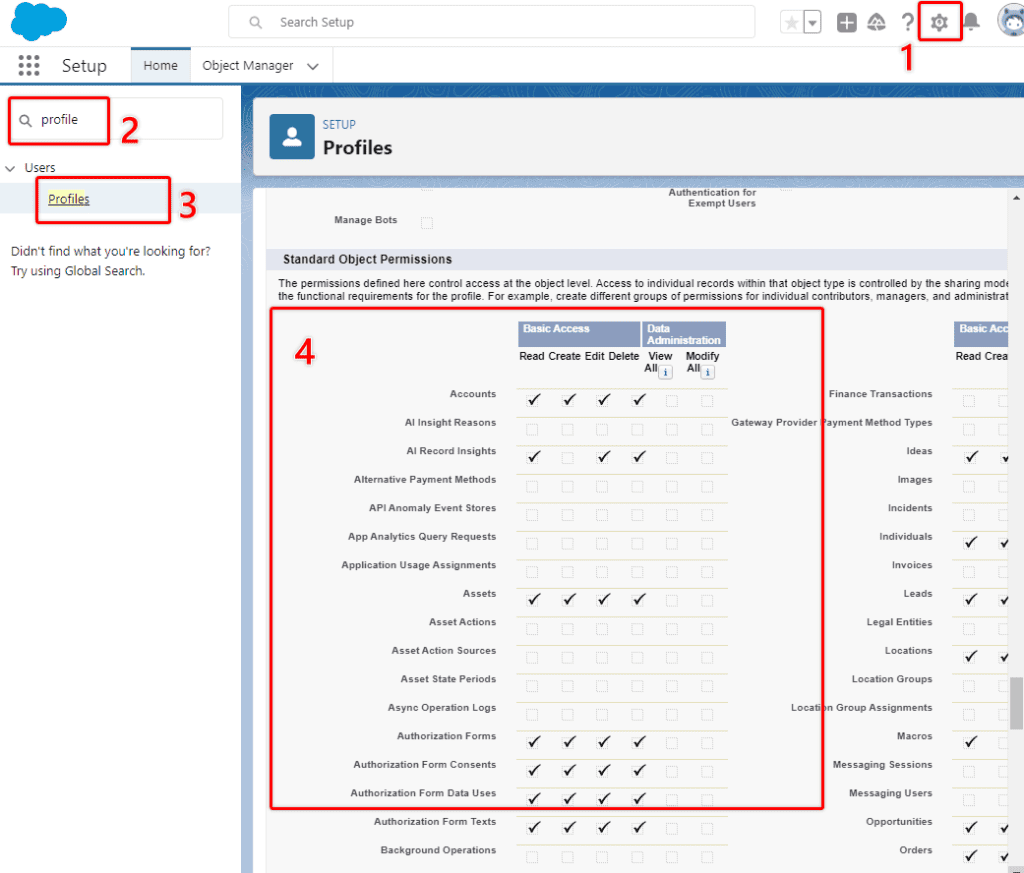
Open Salesforce Setup and search for Profiles in the Quick Find box. Open Profiles under user management and credit the Profile you want to adjust. Scroll down to the Object Permissions area (Standard and Custom), and adjust the access you want users with that profile to have for each app.
You can configure Read/Create/Edit/Delete/View All/Modify settings for each Object.
Option 2 – Permission Sets
In addition to user profiles, access to Objects can also be configured with permission sets, that are then granted to a user. You can create new permission sets dedicated to granular object access, or edit an existing one. In this example, I will edit an existing one.
Open Salesforce Setup, type permission in the Quik Find box, and open Permission Sets. Open the permission set you want to adjust and then choose Object Settings.
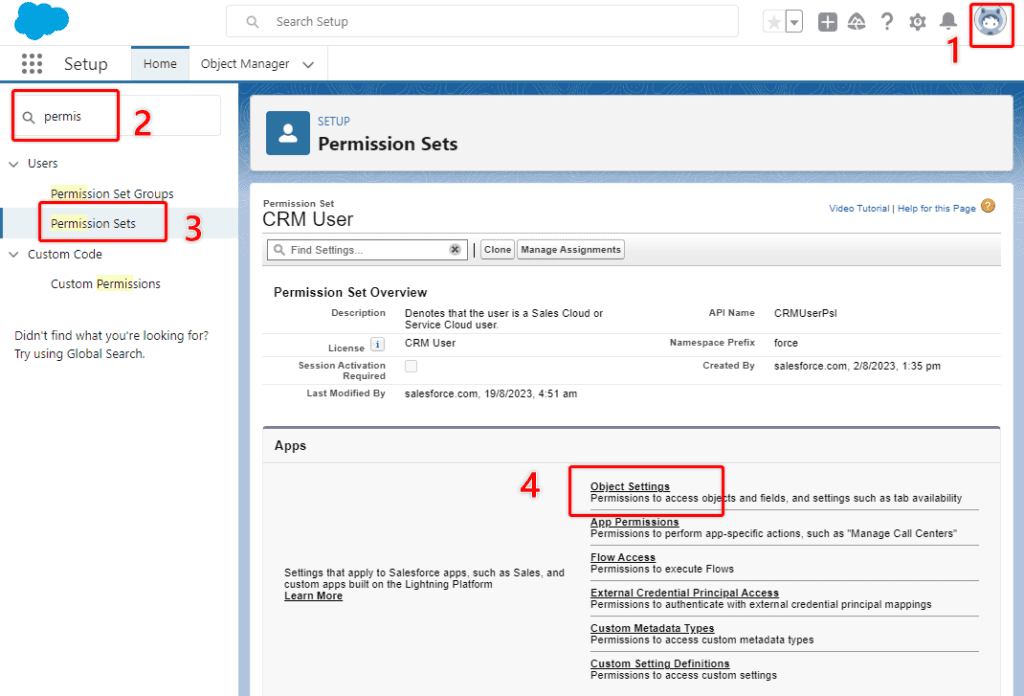
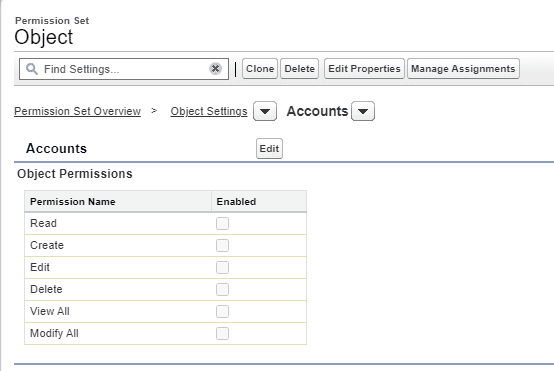
A list of Objects will appear and you can then edit each Object based on your requirements.

You can enable the granular level of access required for each Object on each Permission Set.
Access To Salesforce Fields
When configuring access to a Salesforce field for a particular user, there is a distinction between what field a user can visibly see in Salesforce, and what field can be updated and impacted by a user inadvertently (with flows and automations and formulas etc.). There are three different ways to impact a user’s access to a Salesforce field.
Option 1 – User Profile
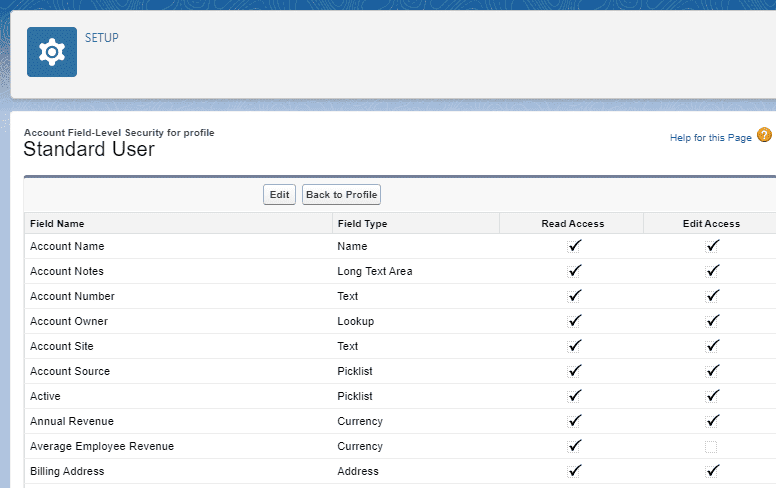
Open Salesforce Setup, search for Profile in the quick find box, and start editing the Profile you want to adjust. Scroll down to the Field-Level Security section and select View on the Object that hosts the field you want to adjust accessibility to.

The list of Object fields will be available for you to view and indicate whether users with the profile you are editing are allowed to read and edit each field.
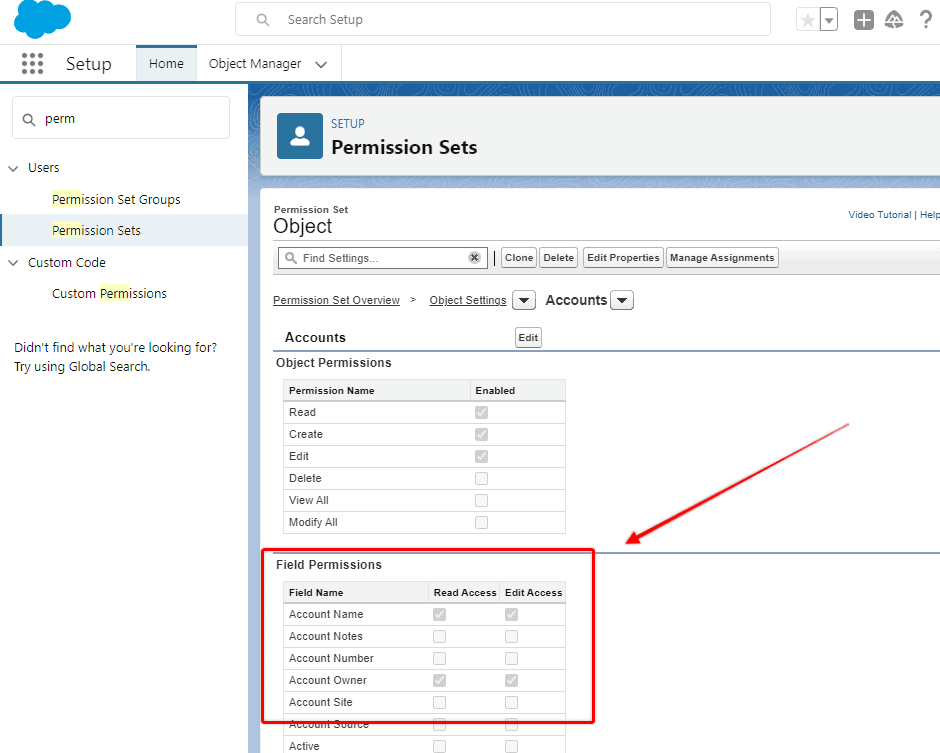
Option 2 – Permission Set
Open Salesforce Setup, type permission in the Quick Find box, and open Permission Sets. Open the permission set you want to adjust and then choose Object Settings.

Select the Object Name for the Object you wish to edit, then edit the read and edit access for each field accordingly.
Option 3 – Object Manager Field-Level Security
Field Level Security Settings can be edited by entering Salesforce Setup, opening Object Manager, and then choosing the field you want to edit from the Fields & Relationships area.
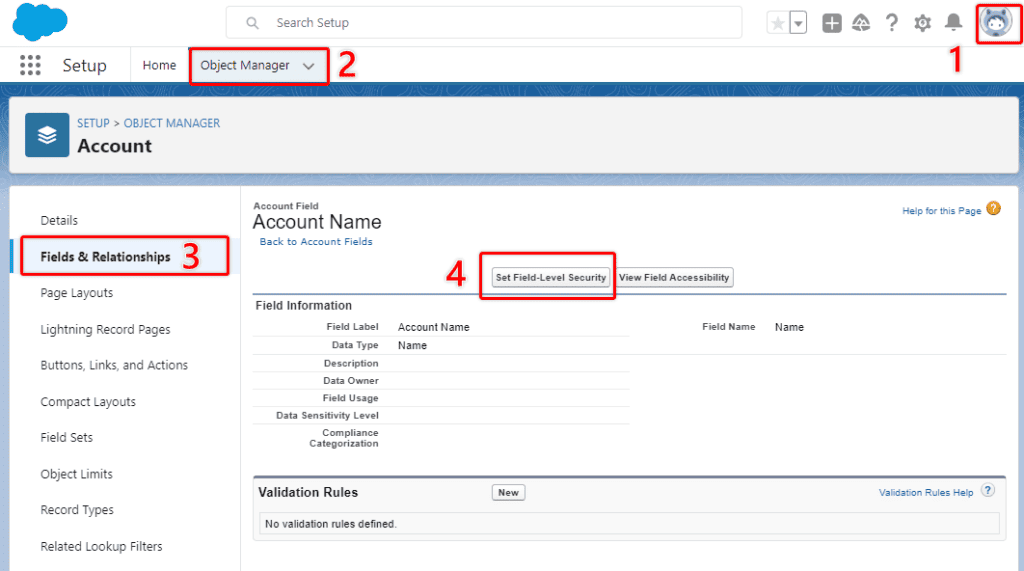
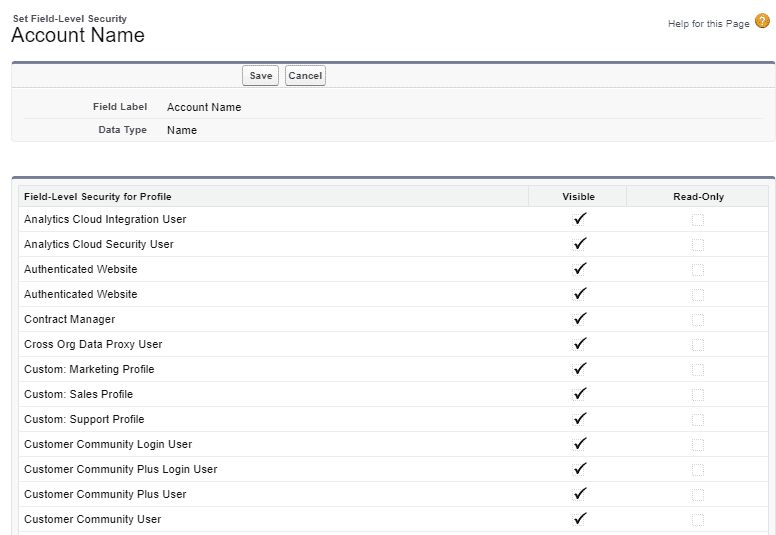
When you select Field-Level Security for that particular field, a list of the profiles in your Salesforce Org will appear and you can adjust the accessibility (read/edit) for each profile in one location.
Option 4 – Page Layout
The final way you can prevent a Salesforce field from being accessible by certain users is via the Page Layout.
Firstly, you can simply leave a field off of all page layouts. This is a practical solution when the field is important to have for administrative purposes (formulas/flows etc.), but you do not want users to interact with the field.
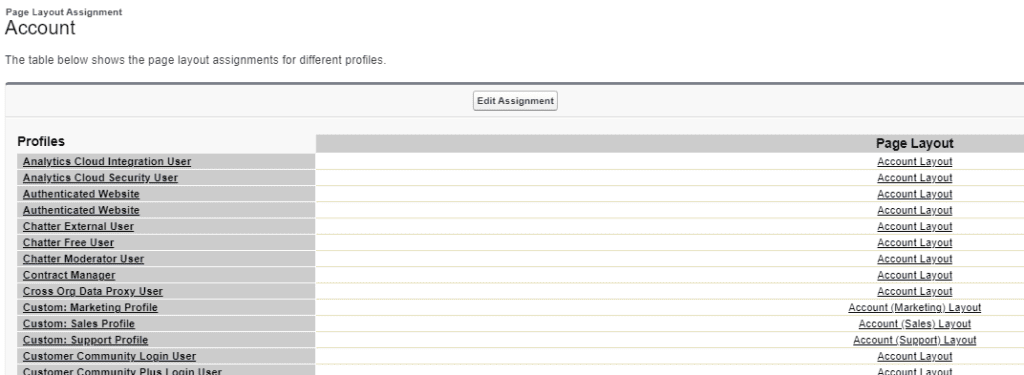
Alternatively, if the field is one that you want some users to access, but not others, then you can create multiple page layouts, and then assign a different page layout to users with different profiles.
Access To Salesforce Tabs
Salesforce tabs are graphical user interface elements that allow users to access different types of information and functionality within the Salesforce platform. Tabs are displayed at the top of the Salesforce user interface and provide quick and easy access to different areas of the application.
A Salesforce user’s access to tabs can be controlled in multiple ways.
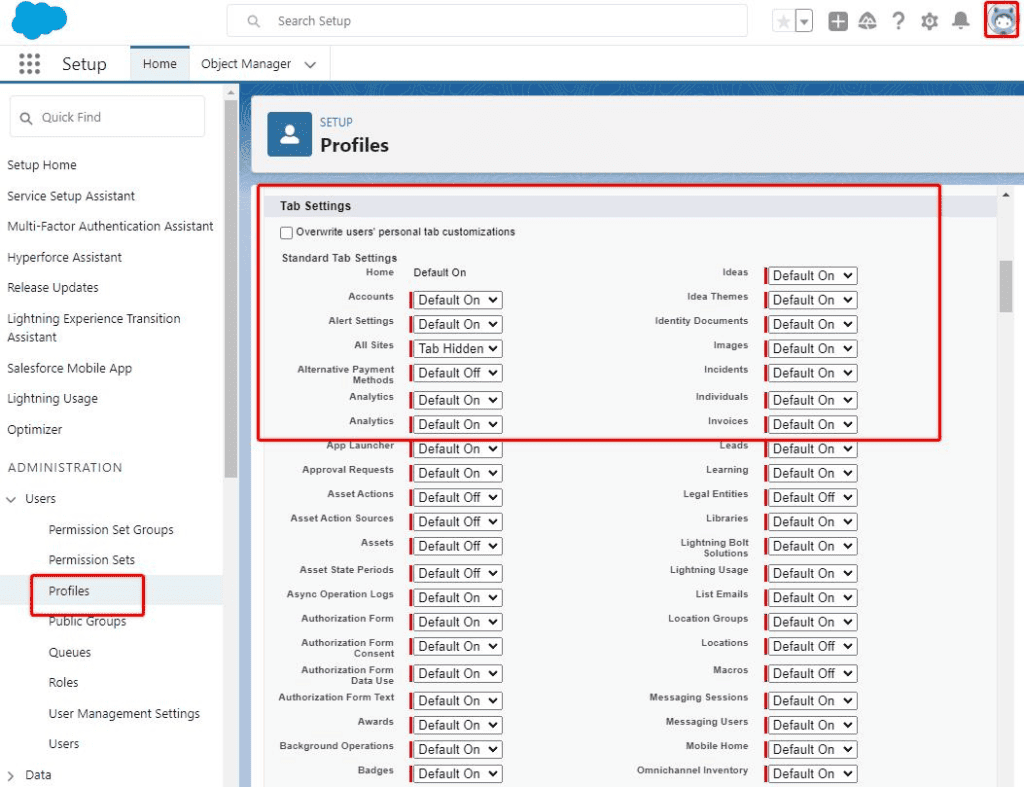
Option 1 – Profile Tab Access
Tab access can be configured for each Profile by navigating and editing the desired profile in the User Administration area, and then scrolling down to the Tab Settings. Tabs can be configured to be Default On, Default Off, or Tab Hidden.
Option 2 – Permission Set Access
Access to a tab in Salesforce can also be enabled, or disabled with permissions sets by editing the permission set, choosing the object whose tab you wish to edit access for, then editing the tab settings at the top of the page.

If a tab is marked as Available then it can be manually added to an Object view by users, if they choose.
If a tab is marked as Visible then it will be added to the user’s navigation bar by default for any apps it is associated with.
Option 3 – App Manager
The other way to determine the visibility of a tab is to configure apps directly in App Manager. If you want to display, or hide a tab in a certain app, open the App Manager.
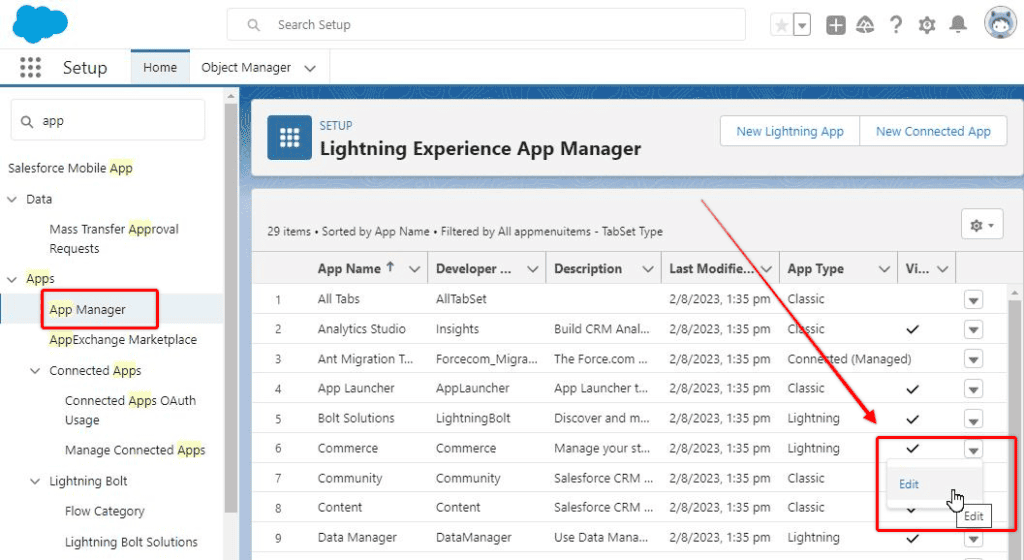
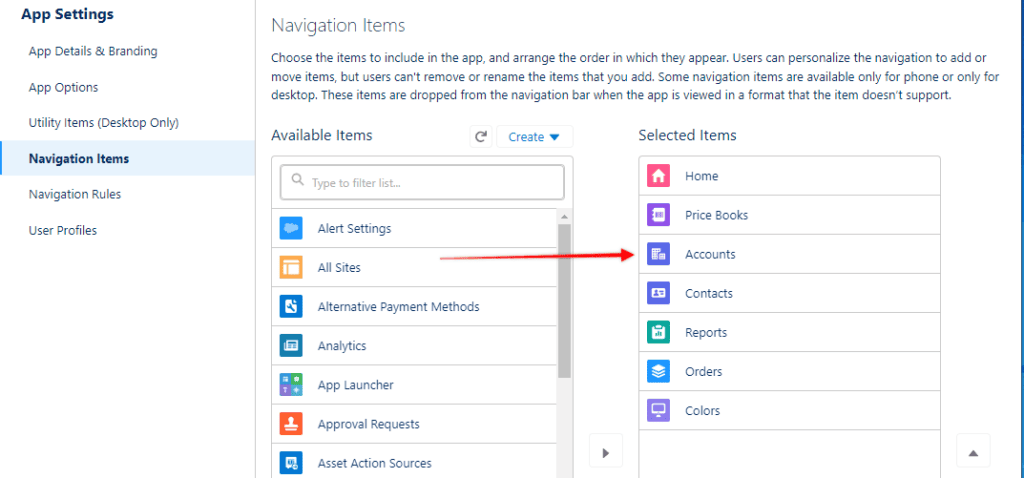
In the App Manager, you can add or remove tabs that will appear on the Navigation Items setting.
Access To Lightning Pages and Components
Lightning pages and components of lightning pages can be configured to be available to certain users only. Access to Salesforce Lightning Pages, and Lightning Page components is configured in different ways.
Configuring Access to Lightning Pages
The users in your Salesforce Org that see a certain lighting page, are determined by the Activation settings you configure for that page. When you create and edit a lightning page in the Lighting App Builder (Setup > search ‘app builder’ in global search), there is an Activation button towards the top right-hand side of the page.
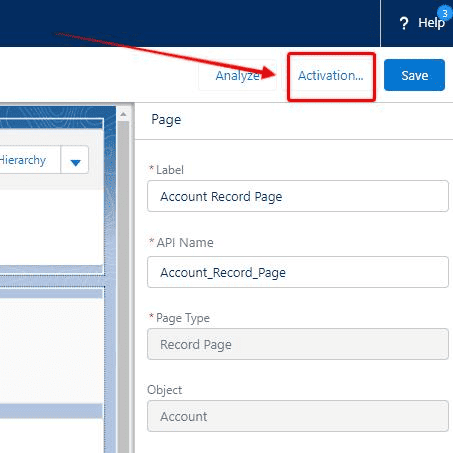
When you open the Activation settings you will see that you have the option of configuring the assignment of the page in three different ways (Org Default, App Default, App, or Record Type and Profile).
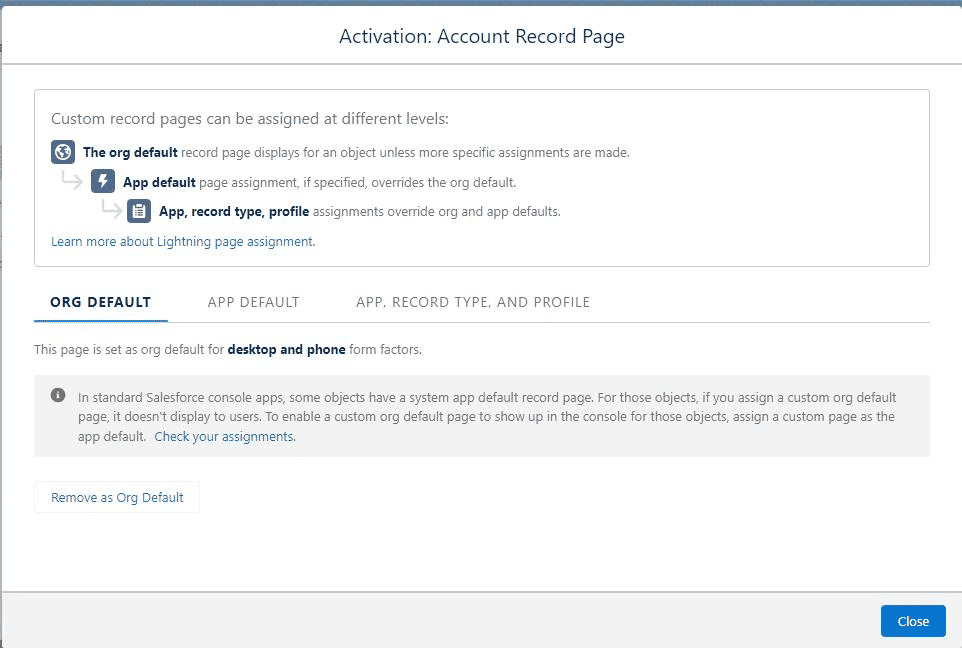
Org Default
Org Default record pages will display for all users when viewing a certain object unless more specific page display options are specific.
App Default
If a Lightning record page is specific for a specific app, then it will override Org Default settings, where different.
App, Record Type, and Profile
Going even more granular, the third setting allows you to specify a record page to be shown for specific, apps, record types, and profiles allowing you to customize the look and feel of a certain object for different users based on their profile, and record types they have access to.
Record types and roles allow you to give staff the most efficient and effective Salesforce user interface and interact with common objects in an individual way.
Configuring Access to Lightning Page Components
While it is possible to create separate pages for certain profiles and record type access, this can become hard to manage as the number of pages you have to maintain can get quite large. Another way to customize your pages to suit specific roles is to adjust the visibility of specific page components based and a range of criteria.
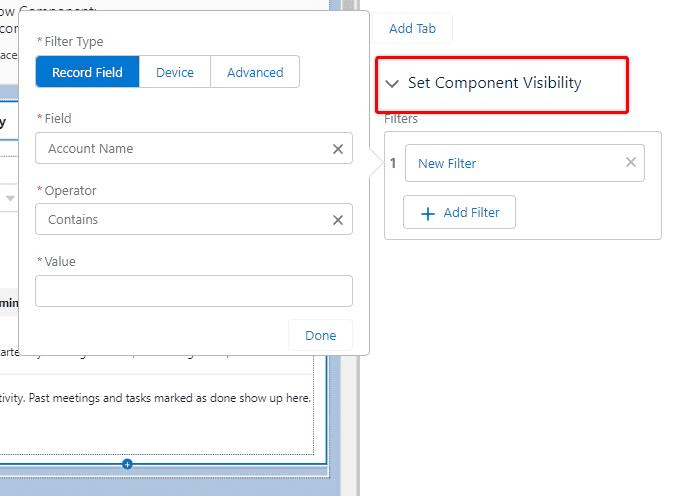
Lighting page components can be configured to display based characteristics of the field value of the object, device form factor the page is being accessed with (Desktop/Tablet/Mobile), or some Advanced filtering options including user role and profile settings.
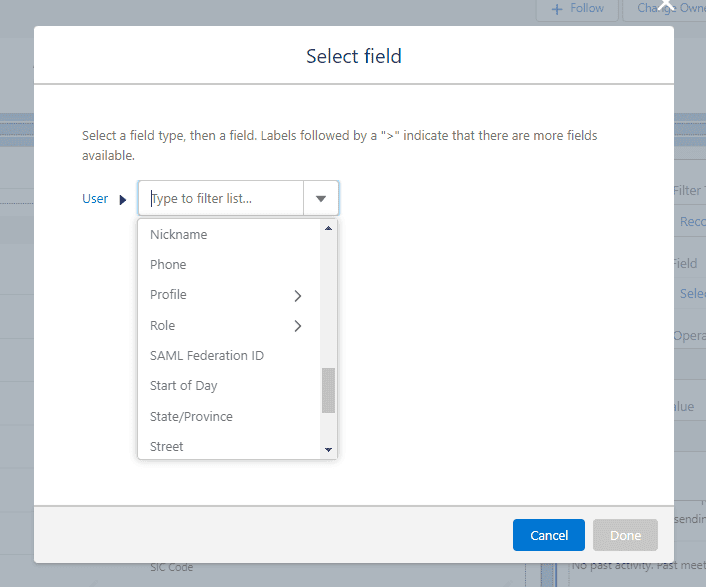
Configuring access to components can be done based on dozens of different characteristics, allowing you to minimize the number of lightning pages you create and maintain, while still hiding sensitized information, or useless information for users, based on their profile or permissions.