Salesforce buttons are an effective way to enable users to get from a place inside Salesforce to another place in Salesforce, or to an external location.
Though buttons can be used to take the end user to a URL of your choice, Visualforce element, or OnClick javascript – URL buttons are the most common use case, and what we will focus on in this.
Table of Contents
Use Cases For Salesforce Buttons
There are endless potential use cases for Salesforce buttons, but here are some of the more common URL button use cases:
- URL that embeds the Account name in a Google Search string to get company news and updates
- Take staff to another internal system (Intranet/ERP)
- Industry News website
- Industry Regulations/Code
- Important Public Documents hosted on Salesforce
Different Types of Salesforce Button
Salesforce buttons vary on two main dimensions:
- Content Source
- Button Location
Keep in mind that Salesforce Actions can be also configured to be triggered by a button, but these aren’t covered in this article, or configured in the same Salesforce setup area.
RELATED RESOURCE: How To Customize The Look And Feel of Salesforce
Salesforce Button Content Source
Salesforce Button content source refers to what the button does. Typically, Salesforce buttons help take you to something. There are three available content sources available for you to choose from when creating a new Salesforce button.
- URL
- Visualforce
- OnClick Javascript
For a beginner administrator, there is no need to learn about Visualforce or Javascript (other than a basic understanding of practical use cases), so this article will show you how to create buttons with the URL content source.
Salesforce Button Location
The second significant way a Salesforce button can be customized is in the location where the button is made available for placement. The three available locations are:
- List Button
- Detail Page Button
- Detail Page Link
Each of these button locations will be covered in detail throughout this article.
Create a New Salesforce List Button
There are two main places you would place a custom List Button.
Directly on an Objects List Views:

Or embedded on a Related List:

Though there are multiple list button locations, a single button can be used in either or both.
Create The Button
Get started by entering Setup, opening the Object Manager, choosing the Object you want a list button for, then clicking on Buttons, Links & Actions. This example will be done using the Account Object.

For demonstration purposes, I’m creating a simple button that makes it easy for the user to find related industry news, with the click of a button.
I have labeled the button ‘Industry News’, selected ‘List Button’ as the button type, chosen URL as the content source, and added a URL that relates to industry news.

The next step is to add the new custom link button to the available locations.
Add Custom Button To The List View Layout
Select List View Button Layout, from the object manager menu.

Open the list view for editing.

Move the new Industry News button, from the Available Buttons column to the Selected Buttons column and then save the changes.

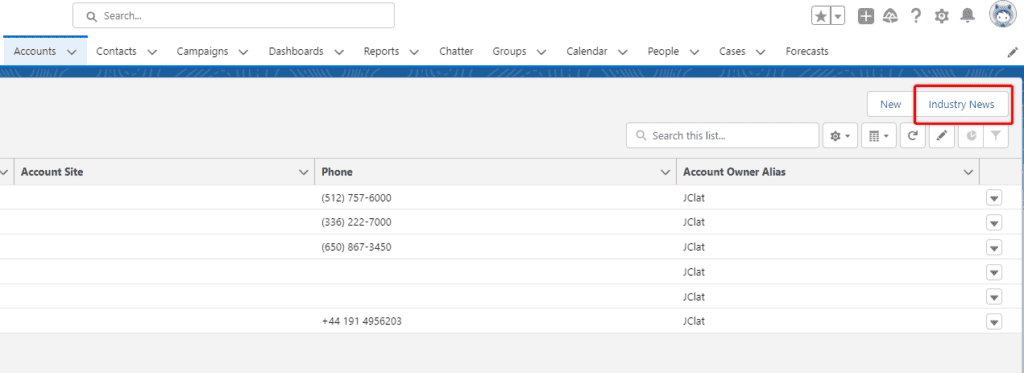
Now, when I go to the Account List View, my new button appears in the top right-hand corner.
Add Custom List Button To Related List View
To add the new button to a related list view, find a Salesforce Object related to the Object you just created the button on, open Object Manager, scroll down to the related lists, and the ‘Properties’ icon.
Given we created this button on the Account Object, I will go to the Campaign object, and add it to the related Accounts list there.


On the ‘Relaties List Properties’ pop-up screen, click the plus icon on the ‘Button’ heading to add a new button to this related list view.

See the ‘Industry News’ custom button in the ‘Available Buttons’ column and move it over to the ‘Selected Buttons’ column.
Click OK, and save your changes to the related list view. When you exit Setup and view a Campaign Record, you will now see the custom button you created, on the related list view.

Create A New Detail Page Link
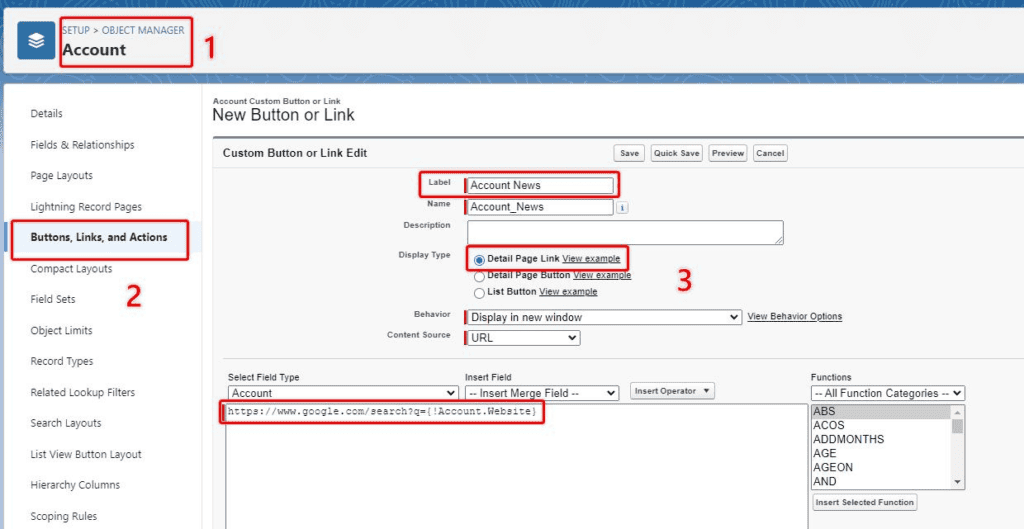
To create a new Detail Page Link, open Setup, Object Manager, Account Object, and create a new Button.
Choose ‘Detail Page Link’ and enter a URL. I have chosen to create a Google search URL that embeds the company name into the Google search string so a Salesforce user can quickly see the most recent news about that company.
Once the button has been created, enter Page Setup, edit the page layout, and you can then view Custom Links and see the link you just created. Drag it onto the page layout and save the changes.
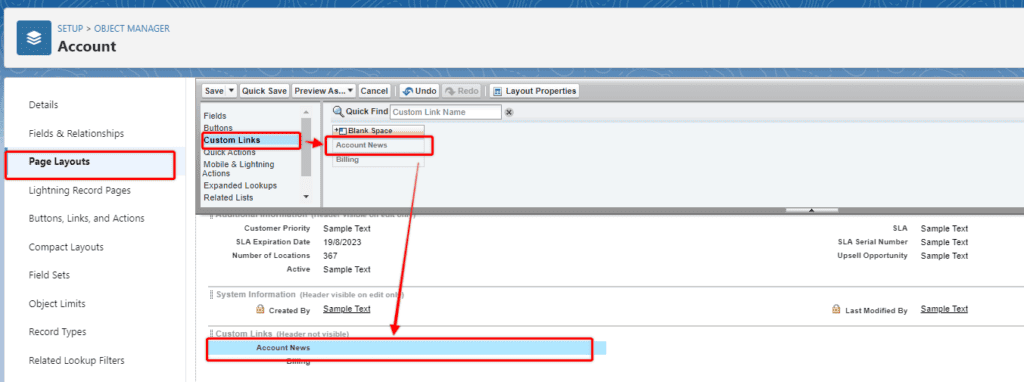
Once saved, go back and view your record of the Account Object (or any other object you worked on) and you will see the new link you created, towards the bottom of the page. These specific links can only show up in this particular section of the Object page layout, there isn’t a standard Object field you can drag into any section you choose.

Create a New Detail Page Button
To create a new Detail Page Button, follow the same steps above, go to the Object Manager of the Object you want to create a button for (in this example, Account Object), navigate to the ‘Buttons, Links, and Actions section, and clicking ‘New Button or Link’. Ensure you select the ‘Detail Page Button’ as the display type. In this case, I’m going to create a URL link type again, using the same Google search query about industry news.

Once the new Custom Detail Page Button has been saved, go to the Page Layout you would like to add the button to, choose Buttons, from the list of available components, then drag the button to the Custom Buttons area of the Object Detail section.
This will ensure your new button appears on Salesforce Classic views.
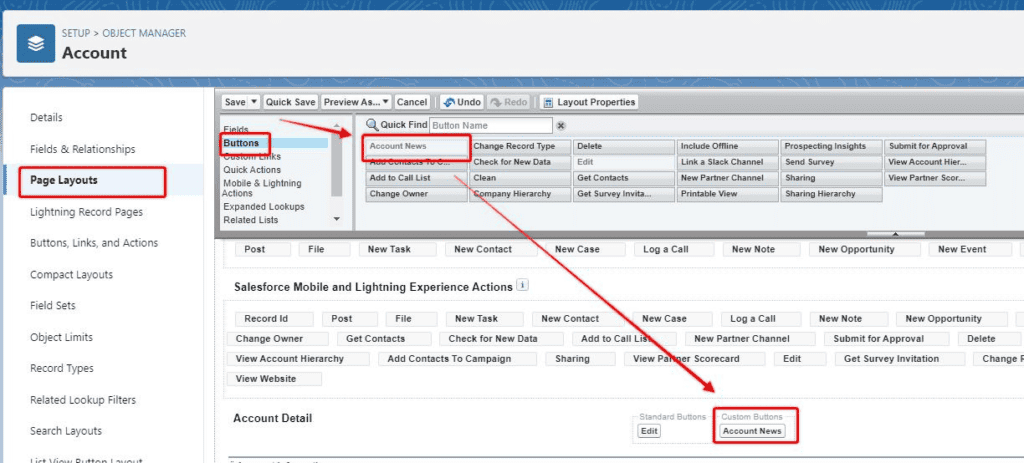
To make sure your new button is also available in Lightning Experience, view your new button in the ‘Mobile & Lightning Actions’ section and drag it on the ‘Salesforce Mobile and Lightning Experience Actions’ section, then save the changes to the page layout.
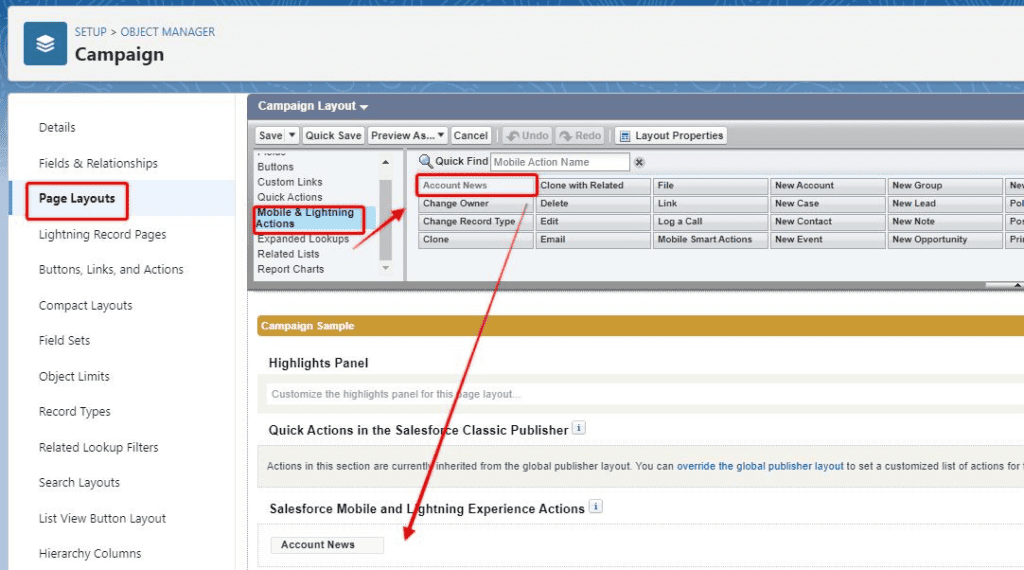

Some people find that new custom buttons they create and add to the Buttons area on the page layout don’t appear on the page when they go and look at it.
Here is a quick article we published on the most common reason for this.